Create your first presentation
Today we will learn how to create a presentation with snappify and how to animate elements smoothly. For this tutorial, we picked an awesome animation that was initially created by Alex Sidorenko.
Here you can see an embedded version of the presentation that we will create today, let’s get started! 🤩
Watch the video tutorial 🎬
Create a new snap
Go to the Dashboard and click on the Add snap button. Start with a blank snap.
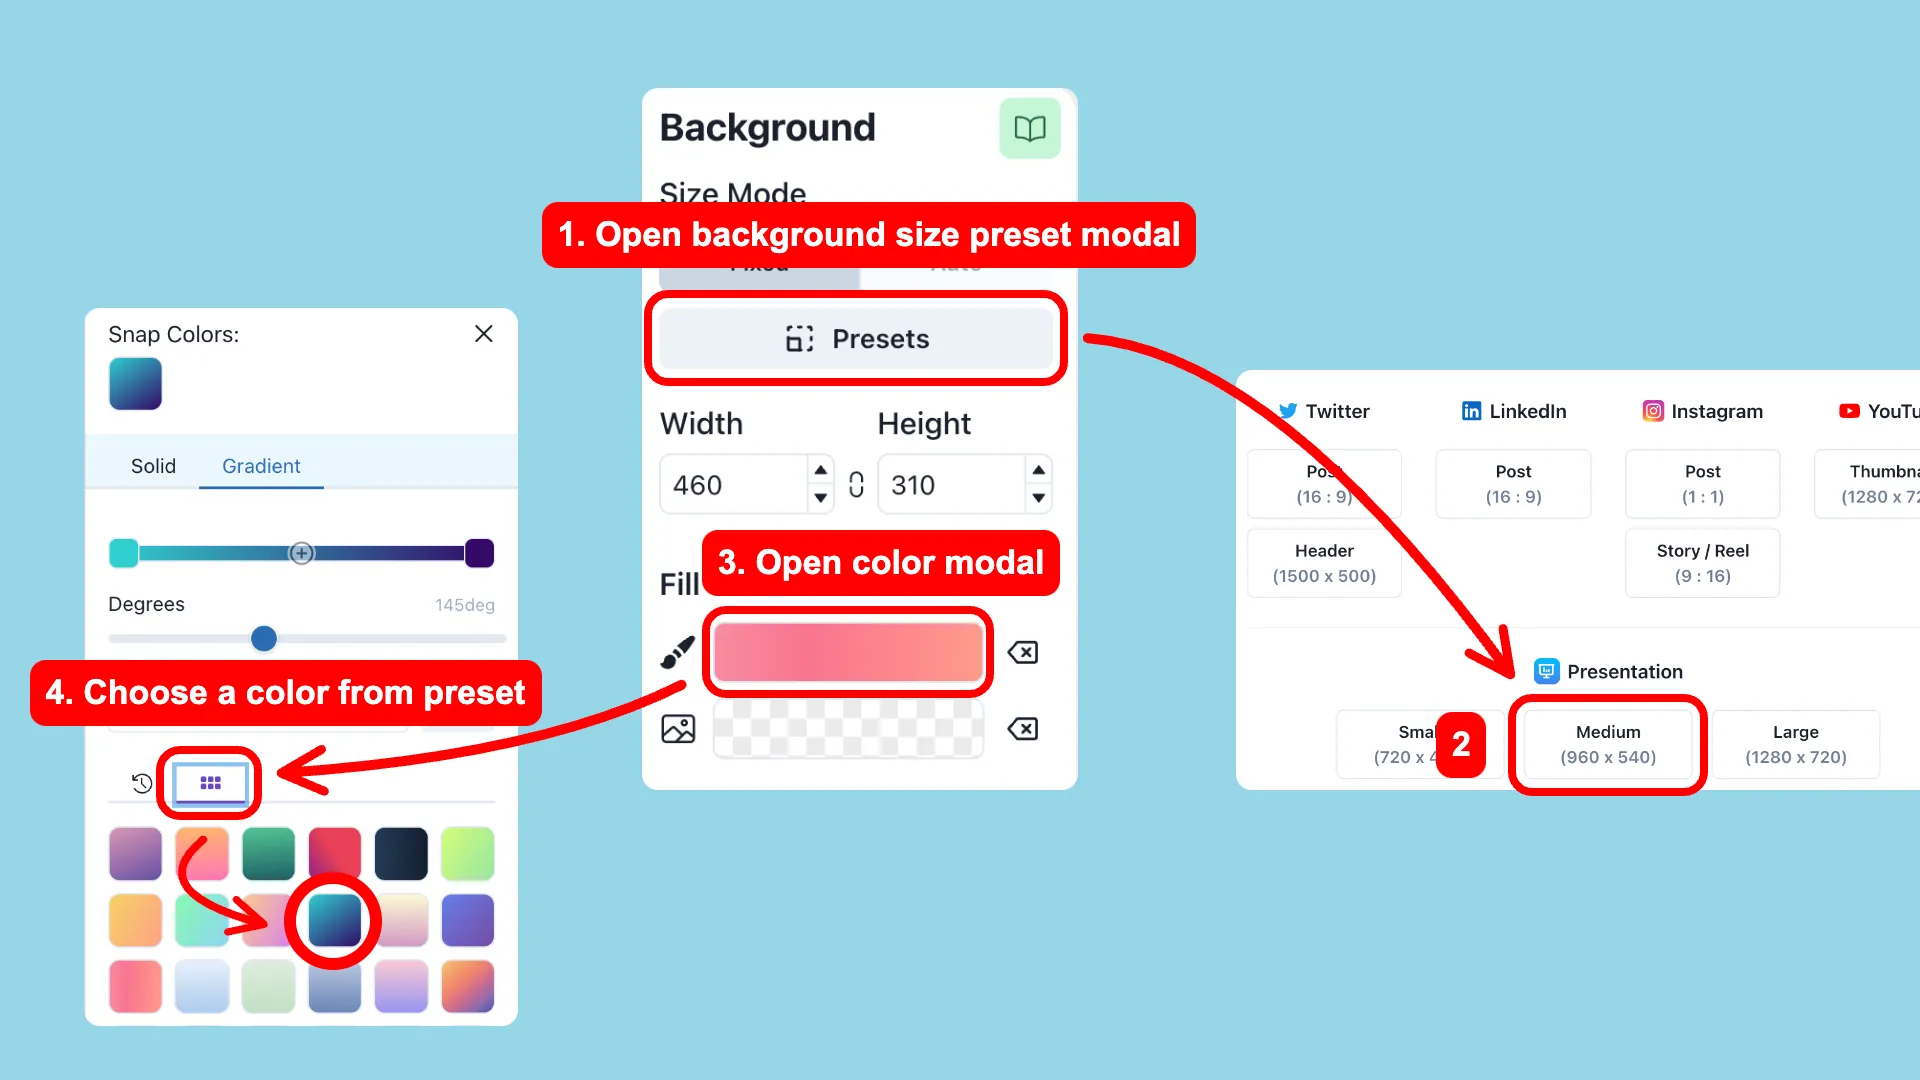
On the editor page, we will start with adjusting the background. First, we’ll choose a size from the Presets. In this case “Presentation Medium”. Second, we choose our desired background color from the Gradient presets.
Add the code-editor
Next, we will add a code-editor, drag it to the left side and center it vertically - the snapping guideline will help you there. Then paste this code into the code-editor:
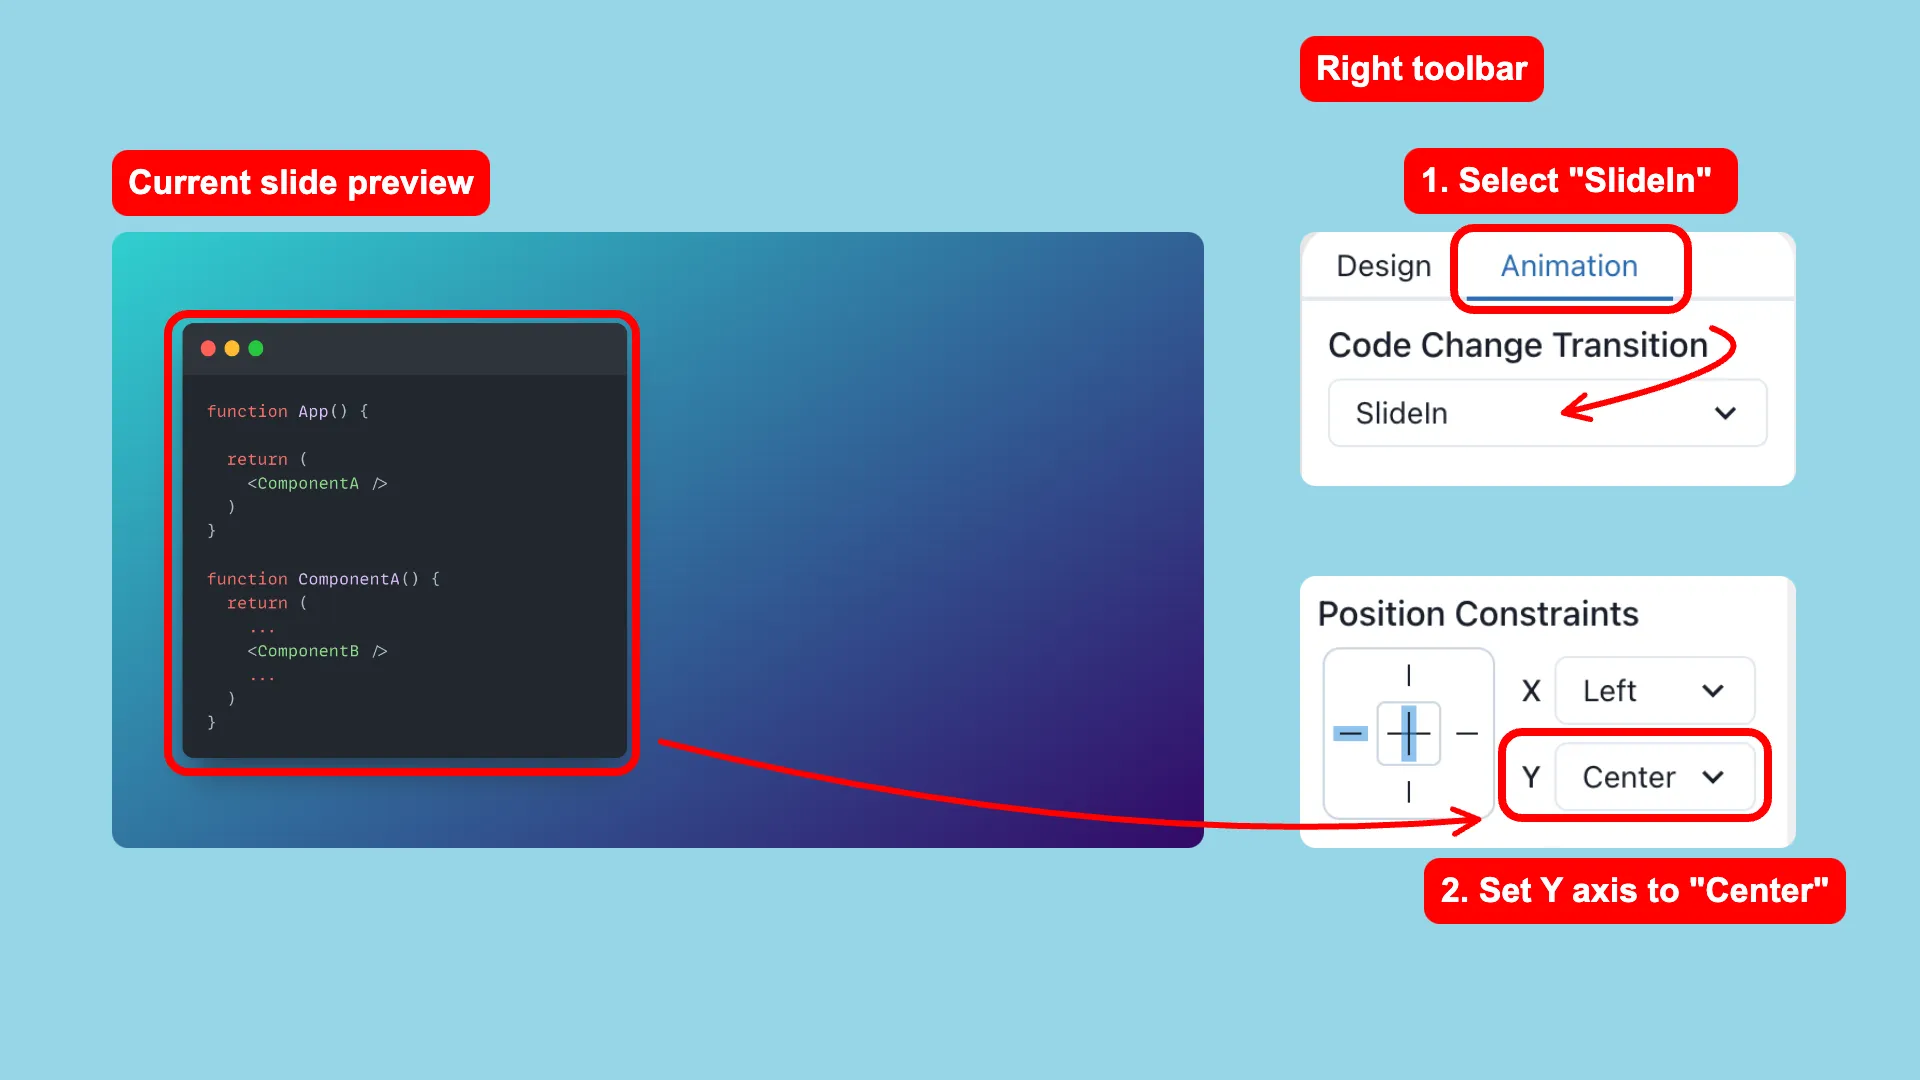
On the right toolbar, we’ll switch to the Animation tab and select the SlideIn option for Code Change Transition.
Snappify comes with various options to animate code changes across Slides. You can choose between SlideIn, FadeIn, TypeWriter, Morph and None. Default is set to FadeIn.
In this tutorial, we will keep it simple and will choose the SlideIn option.
As next go back to the Design tab and set the Y axis to Center in Position Constraints. This will keep the code-editor centered vertically when the code content grows or shrinks. We will see this later in action. 😎
The visual model
The visual model on the right side of our presentation example has a few repeating structures and contains a lot of elements. This is a perfect use case for element Grouping. Let’s see it in action.
First add a rich-text element, clear the background, set the font-size to 21, the color to white and type “App” as text content.
Then add a rectangle element right under the rich-text element. The dimension should be 115 × 115.
Border width 6 and the border color should be white. Once we have them, we can select the two elements and group them together.
Grouping elements
On the element tree (Left toolbar) you see all the elements of your current Slide. You can select multiple elements by pressing Shift and clicking on the elements, or by a drag selection on the canvas. Once you have selected the elements you can group them by opening the context-menu via right-click on the element tree and select Group selection.
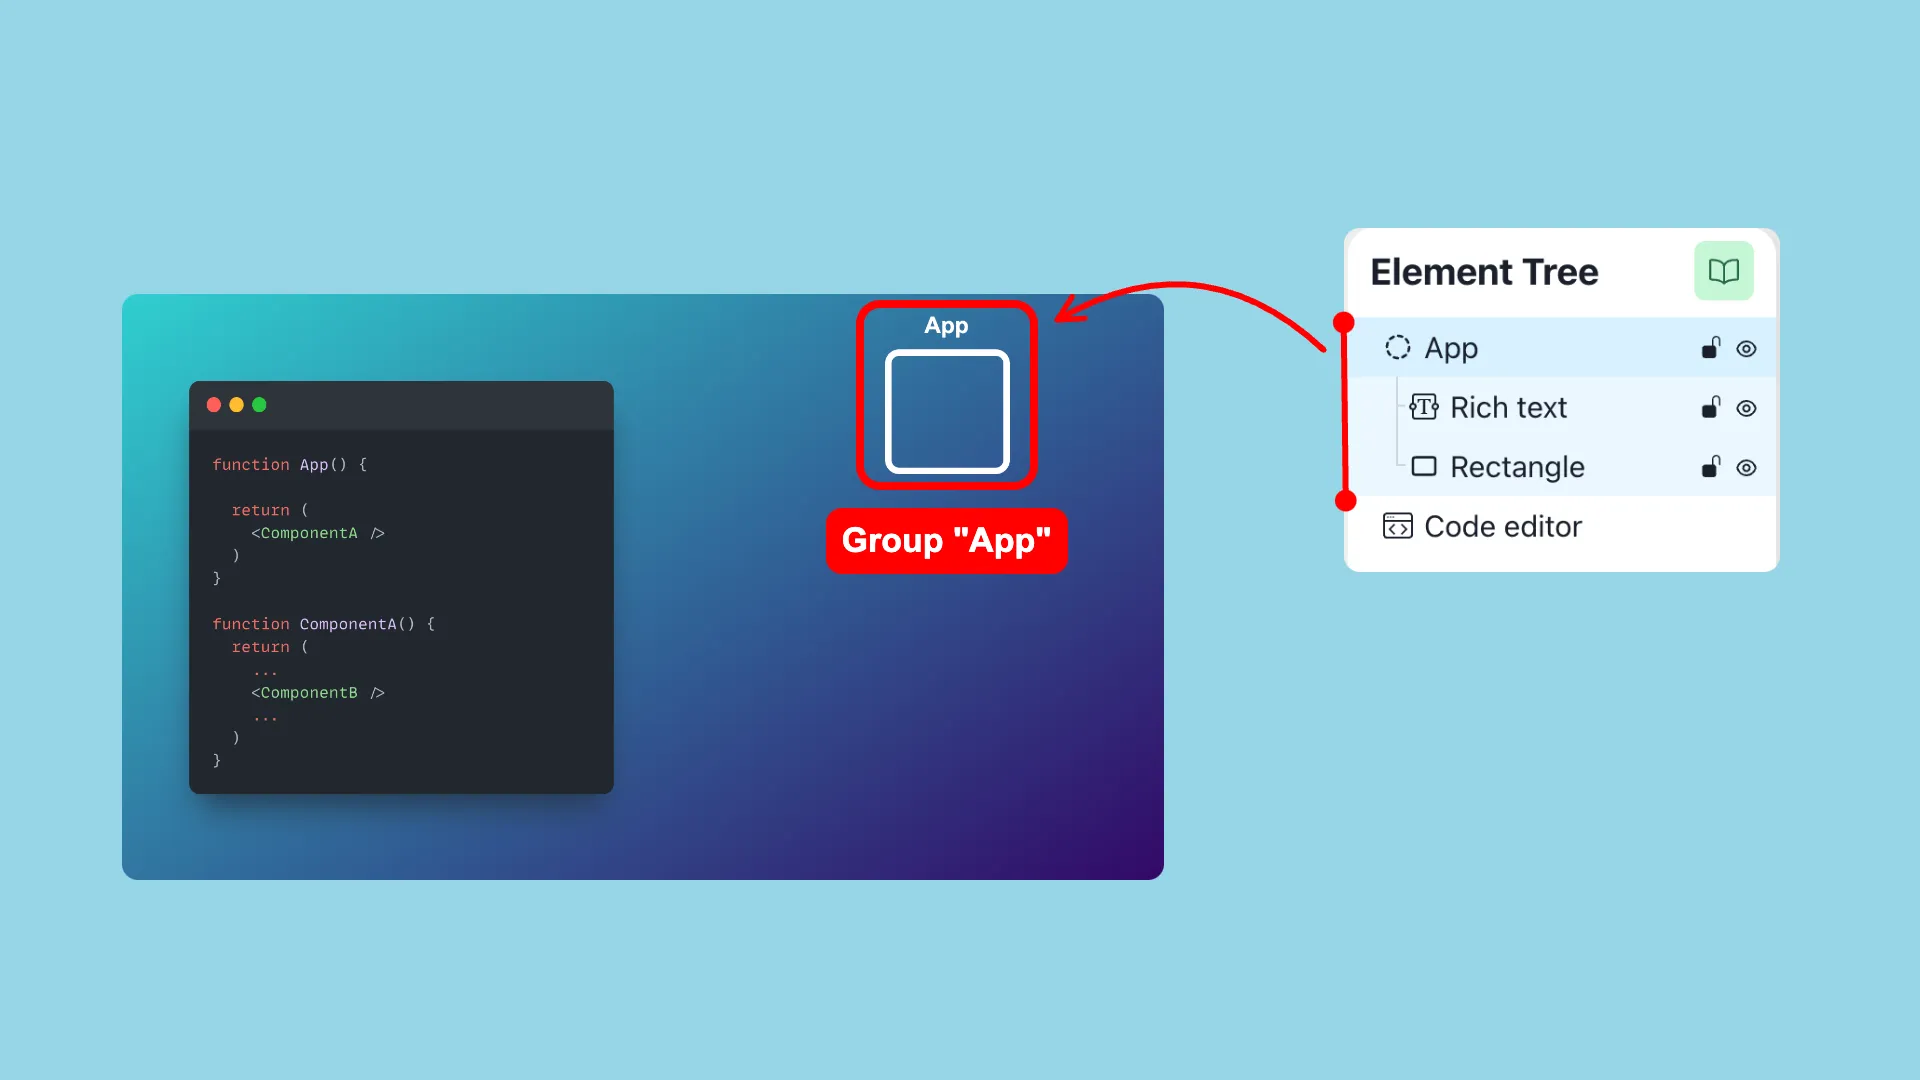
Open the context-menu again and rename the group to “App”. This will help us to get a better overview of the elements. Since the “ComponentA” and “ComponentB” are repeating, we will just duplicate the “App” group twice. In order to do that, open the context-menu of the “App” group and select Duplicate. Rename them to “ComponentA” and “ComponentB” as well.
Grouped elements behave like a single element on the canvas. This is convenient when you want to move those elements at once.
But how can I edit the content of the rich-text element inside a group? 🤔
Well, there are multiple ways to do that. Here are two common methods:
- Double-click on the group in the canvas to focus the underlying element. Once an element inside a group is selected you’re also able to select other group children on the canvas. Select the richtext element and double-click on it to edit the content.
- Select the richtext element directly in the element tree and press Enter to edit the content.
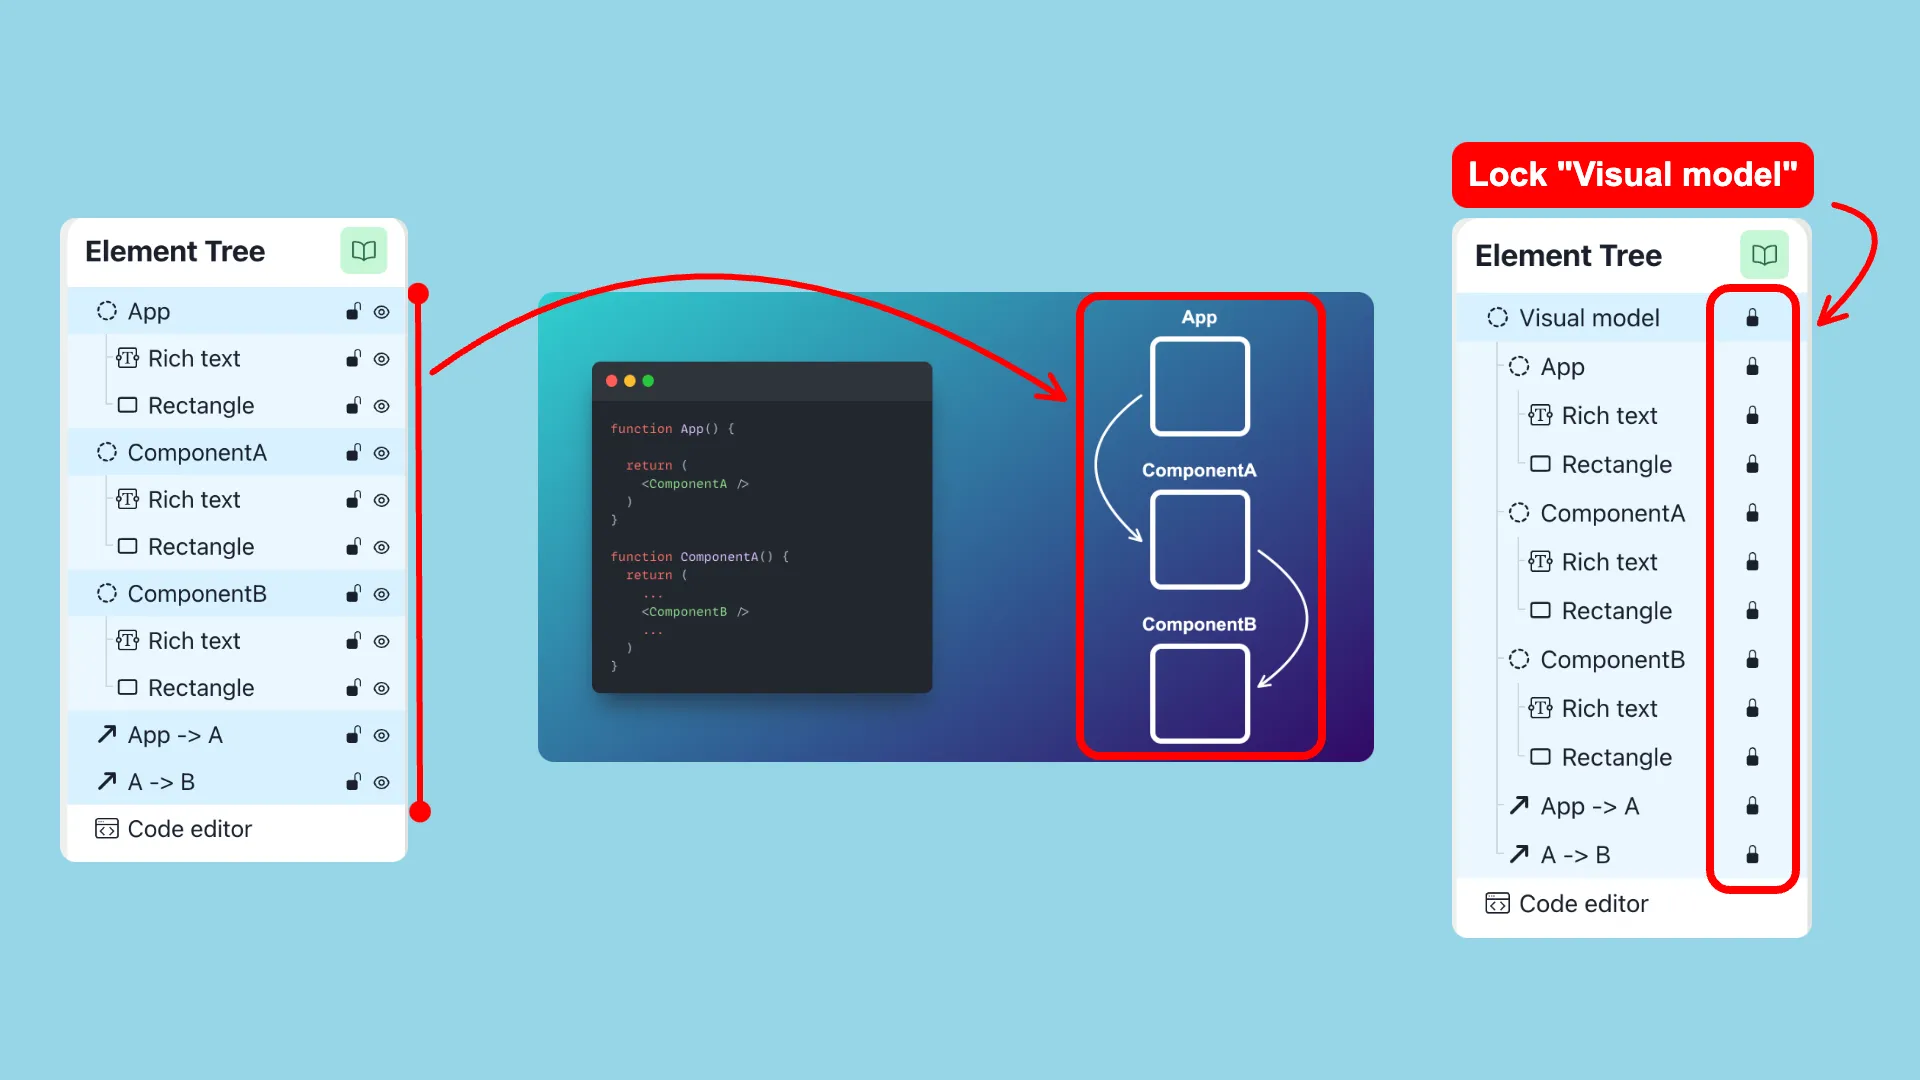
Next, add the 2 arrow elements. Then select the whole visual model elements and group them again together as “Visual model”. Now you can lock the group by clicking on the lock icon in the element tree. This will prevent you to select it on the canvas accidentally.
Tip 💡: You can collapse groups in the element tree. This will help you to get a better overview of the elements in your Slide.
Creation of the second Slide
Now we have the first Slide ready. Let’s create the second Slide. On the bottom of the editor, you see a small preview of your current Slide. You can click on the Add Slide button to create a new Slide. However, since the Slides are very similar we will just duplicate the first Slide.
Step 1: Open the context-menu of the first Slide
Step 2: Select Duplicate. Now you should be on the second Slide.
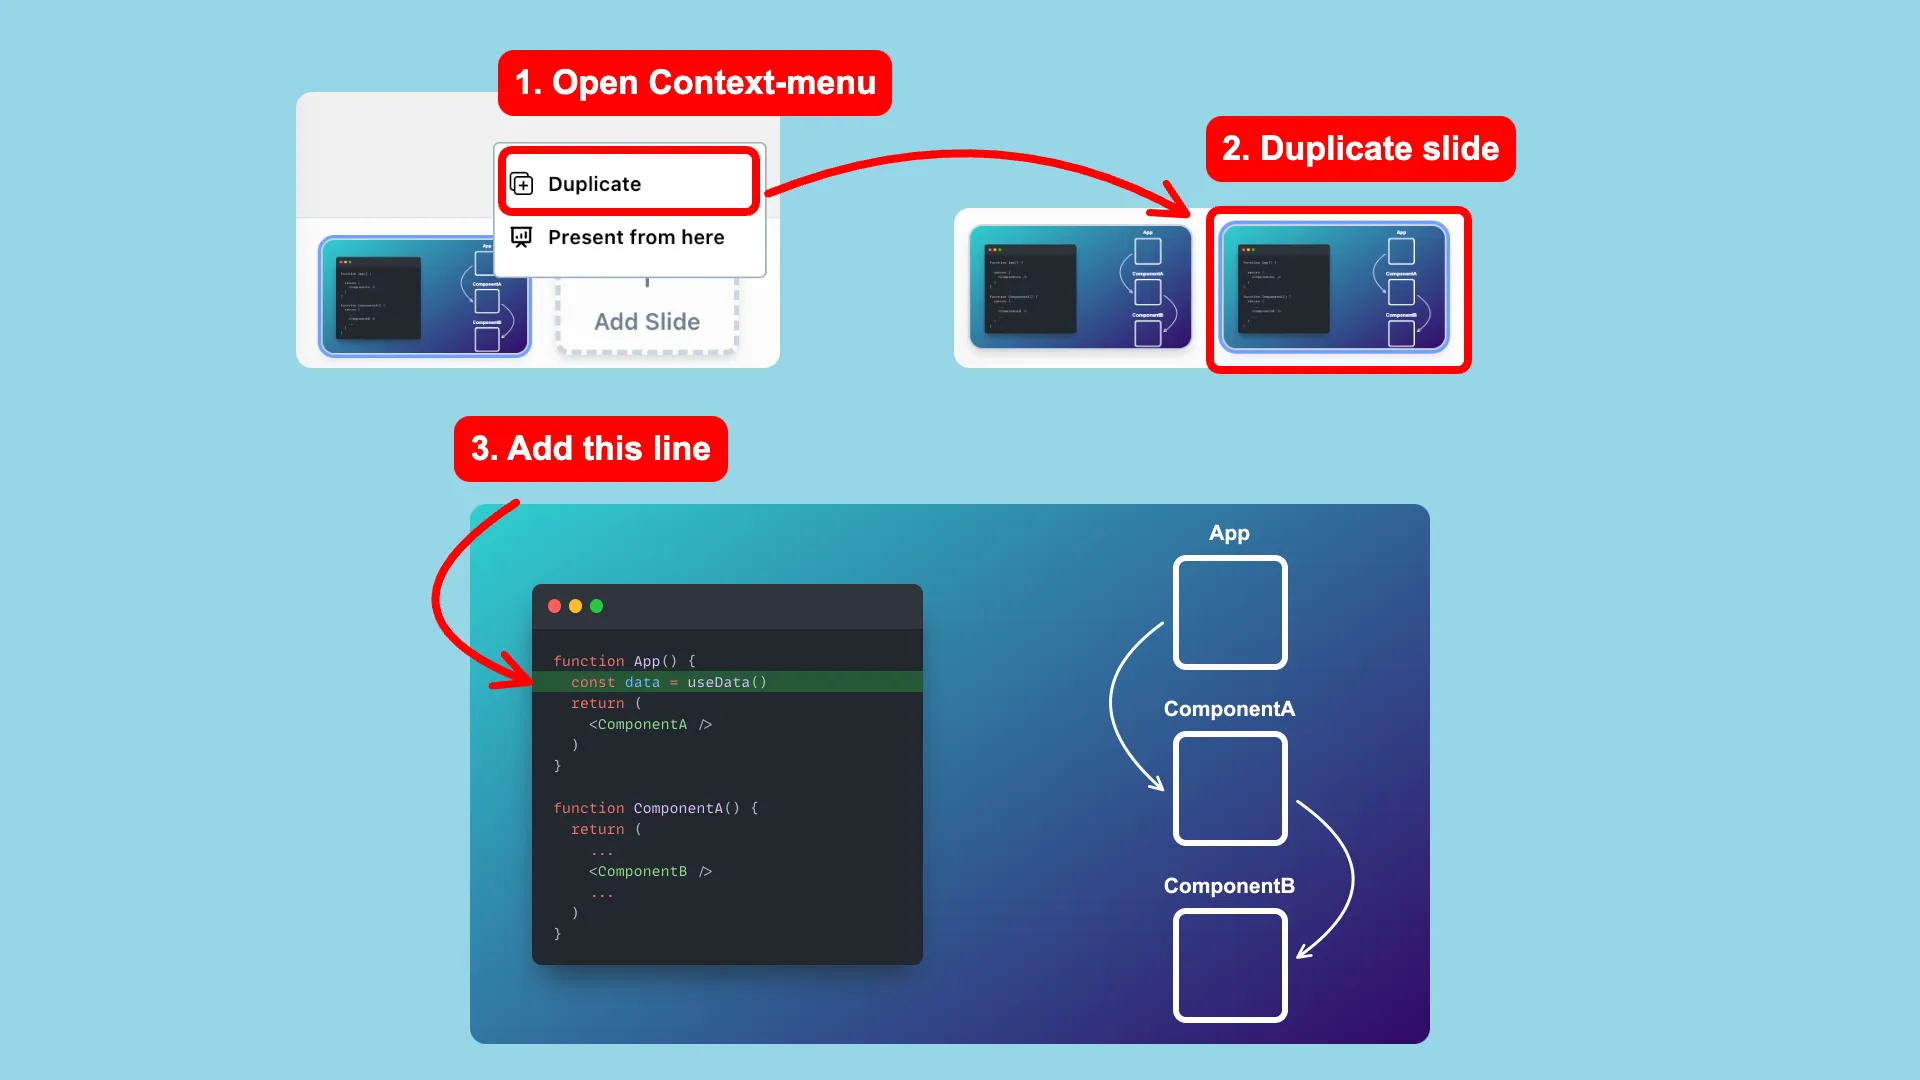
The current active Slide is marked with a blue border in the Slide preview at the bottom of the editor.
Step 3: Add this code to line #2 const data = useData().
Now it’s time to see the Code Change Animation in action. Press the “Present” button 🍿
Pretty Cool, right? 😎
Circle movement animation
Now we will add a circle movement animation on the visual model.
Step 1: Add an ellipse element as a circle with the dimension 48 × 48 and place it right in the center of the “App” rectangle.
Step 2: Then duplicate the circle and place it exactly in the same position as the previous circle on top of it.
Why do we need two circles? We’ll deep dive into that soon.
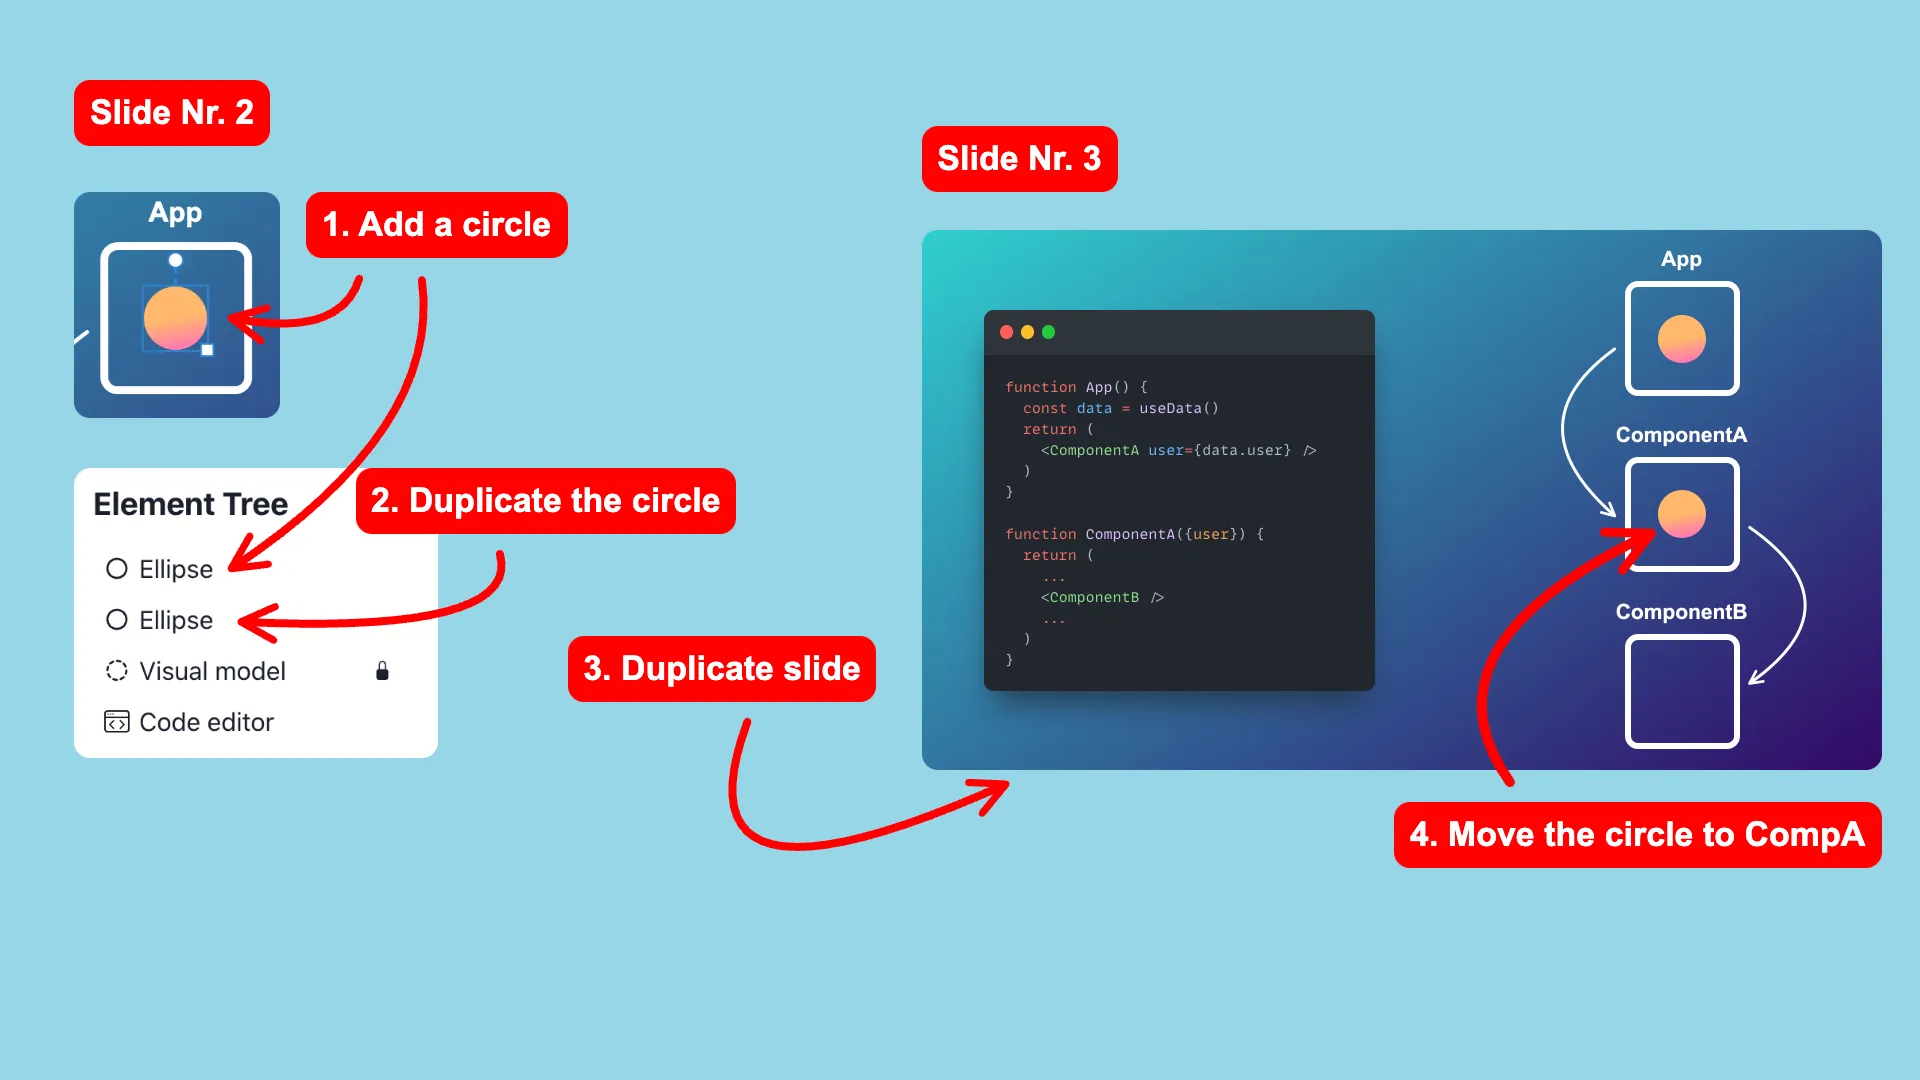
Step 3: Duplicate the Slide Nr. 2
Step 4: On the third Slide we’ll move the circle to the “ComponentA” rectangle.
Now it’s time to see the circle movement animation in action. Press the “Present” button again 🍿
Ok, that’s a good start. But first, let’s understand how snappify handles the animation behind the scene.
How does snappify handle the animation?
Let’s break it down: First of all, we need to understand how snappify can make the animation between the Slides.
All elements have a unique identifier per Slide. If you duplicate an element to another Slide (either by duplicating the whole Slide, or just by copy and pasting a single element) snappify can link those elements together.
So if you change for example the position of a linked element on the next Slide, snappify will automatically animate the transition of the two states. Snappify can also animate the size, opacity, rotation, tilting, scale, border-radius and even colors. Also, the code change animations are working in the same way.
With that knowledge. I think we can get a bit more creative with the circle animation. 😏
Advanced movement animation
Let’s add a bit more advanced movement animation to the circle.
Step 1: Go to the previous Slide Nr. 2
Step 2: Select the overlaying circle on top.
Step 3: Make the circle a bit smaller. The dimension in this case 26 × 26.
Note: For some elements, it makes more sense to scale them instead of changing the width and height.
Step 4: Additionally set the opacity to 0.
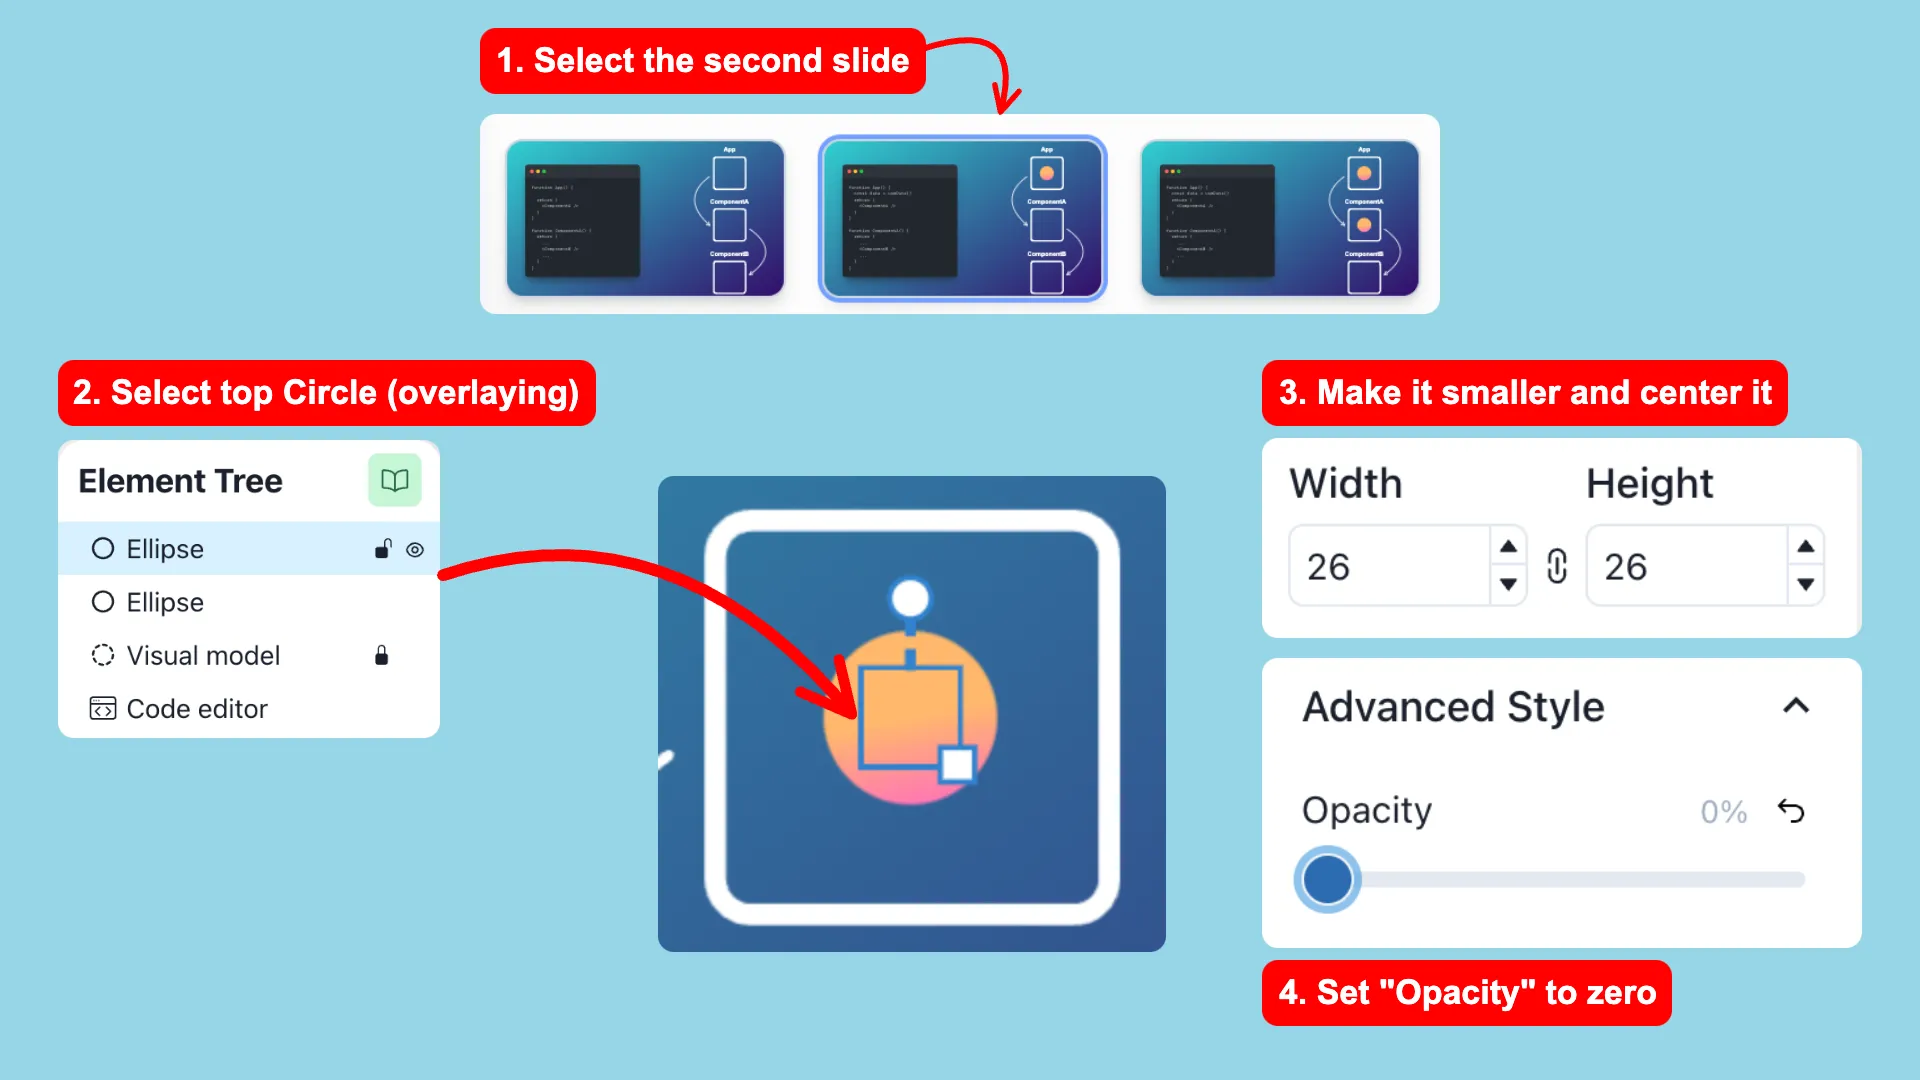
Can you guess how the animation going to look like? Let’s see! Press the “Present” button 🍿
We basically added a FadeIn and ScaleIn animation to the circle. Now the circle animation looks very smooth. 😍
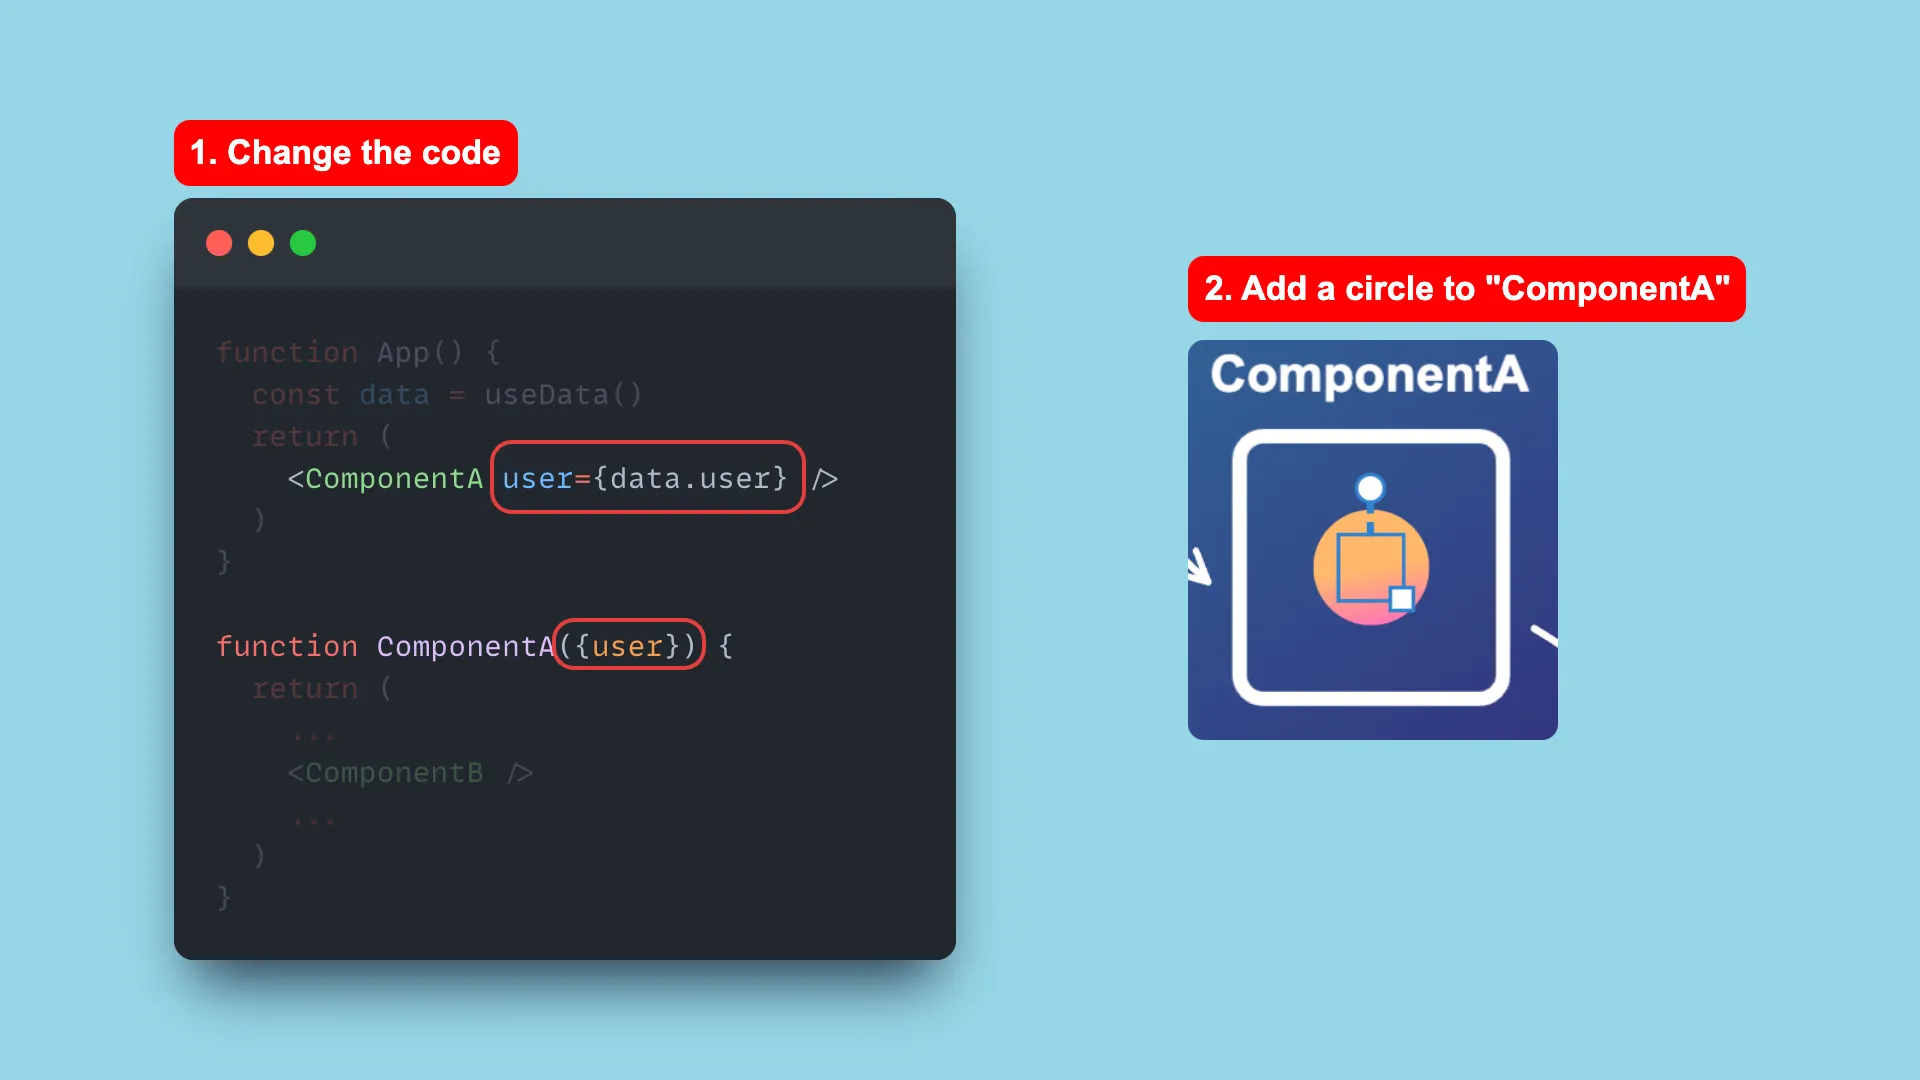
Finalize the Third Slide
Now we will finalize the third Slide and prepare the elements for the next Slide.
Step 1: Select the third Slide and change the code.
Step 2: Duplicate the circle from ComponentA, make it smaller and set the opacity to 0. The exact same steps as we did on the previous Slide.
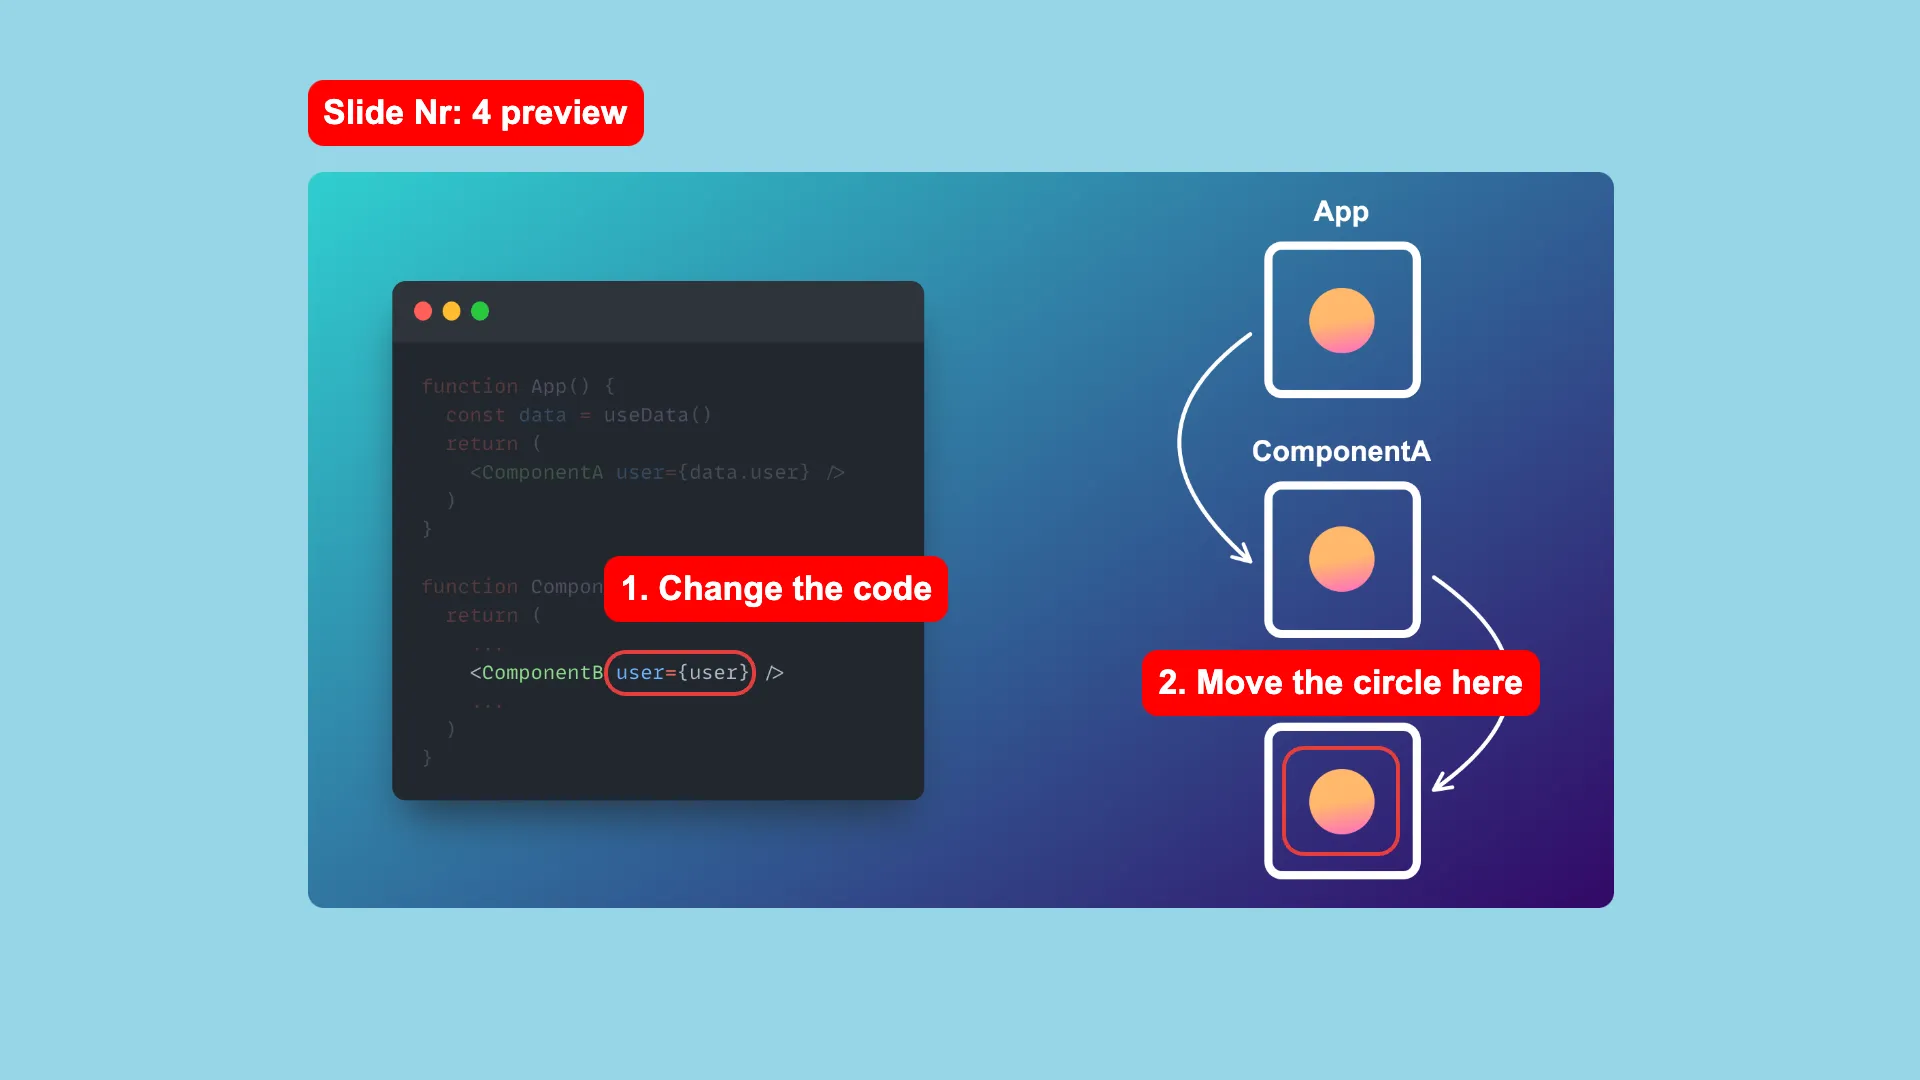
Slide Nr. 4
Duplicate the third Slide and make sure you are on Slide Nr. 4
Step 1: Apply the code changes.
Step 2: Move the circle to the “ComponentB” rectangle, and make it visible and bigger again.
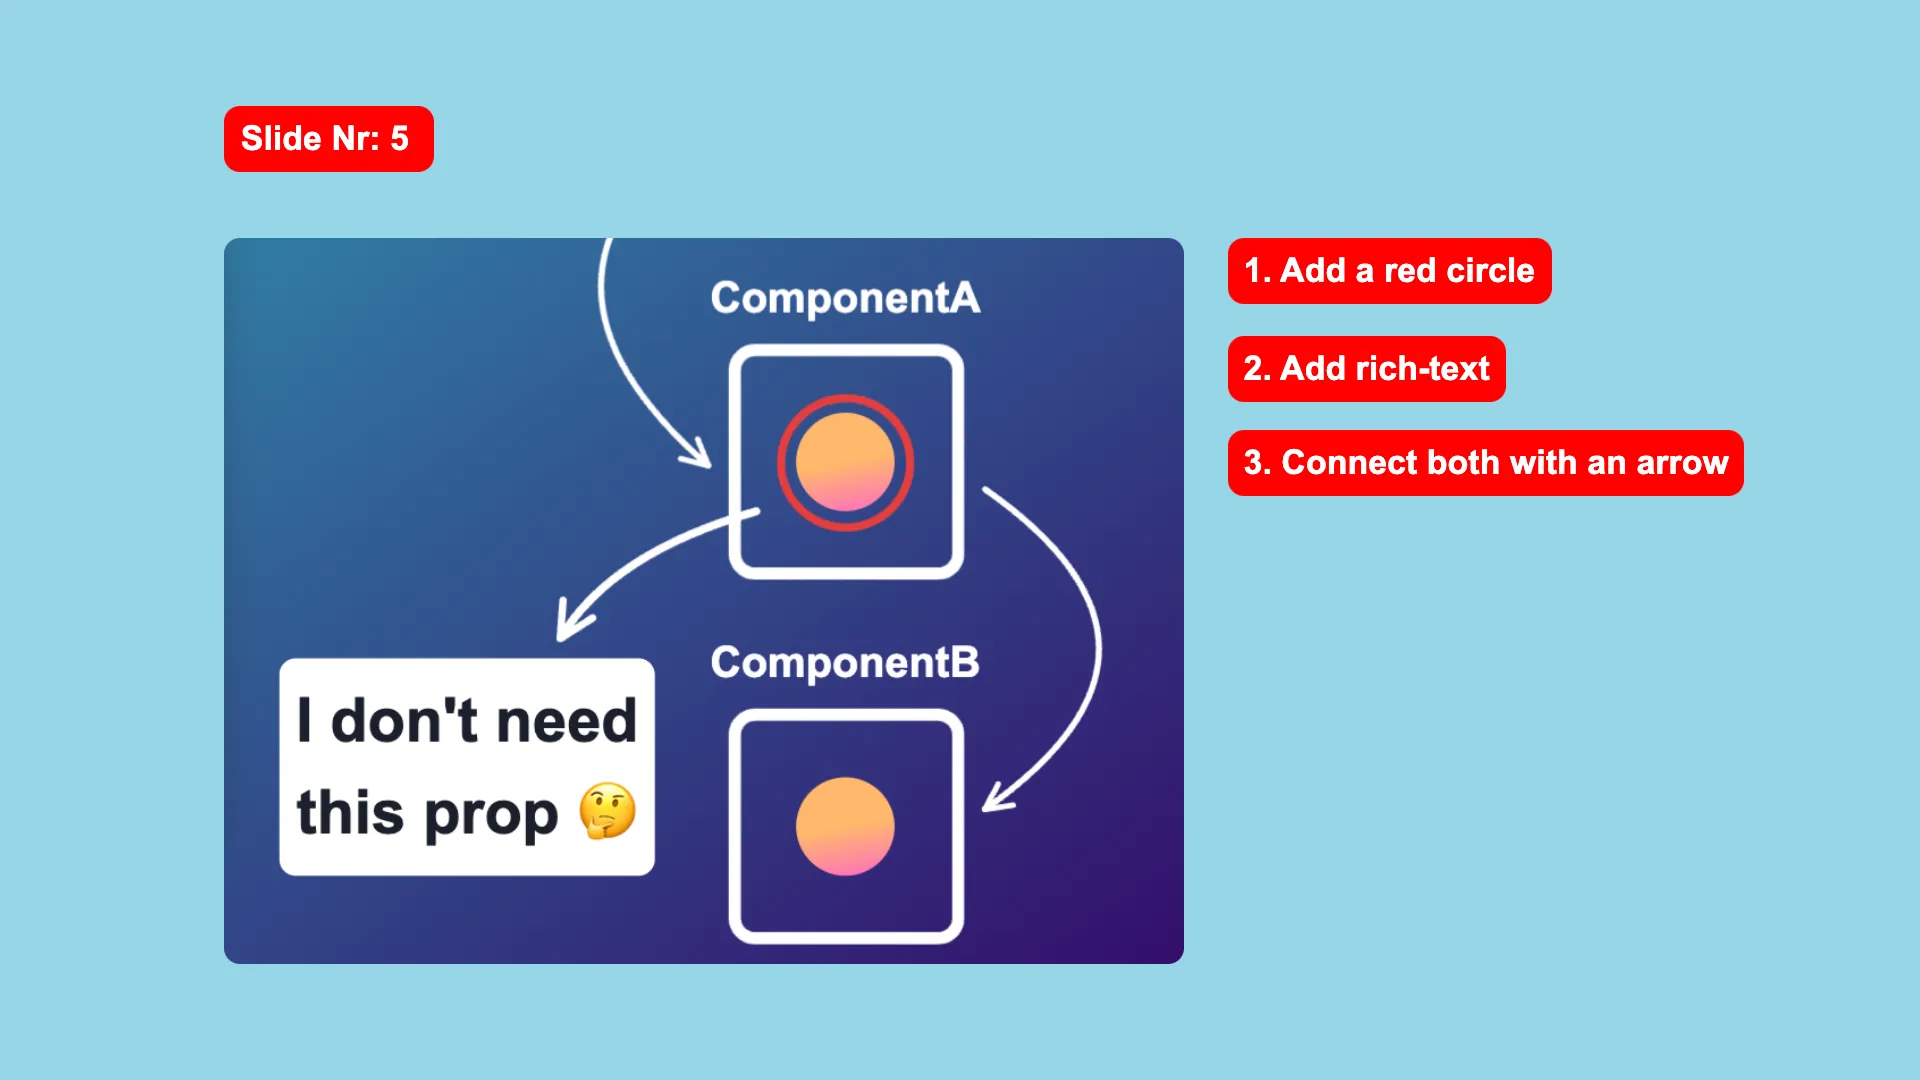
Slide Nr. 5
Duplicate the fourth Slide and make sure you are on Slide Nr. 5
Step 1: Add a red-bordered circle around the circle from ComponentA.
Step 2: Add a richtext element beside it and type I don't need this prop 🤔
Step 3: Connect the red circle with the richtext via an arrow element.
PRO Tip 💡: Hide the whole “Visual model” Group by clicking on the “Eye icon” in the element tree. Do the same for the circle with the gradient background so that only the red circle and the richtext is visible. Now it is much easier to attach the arrow to both elements. After that, you can make the hidden elements visible again.
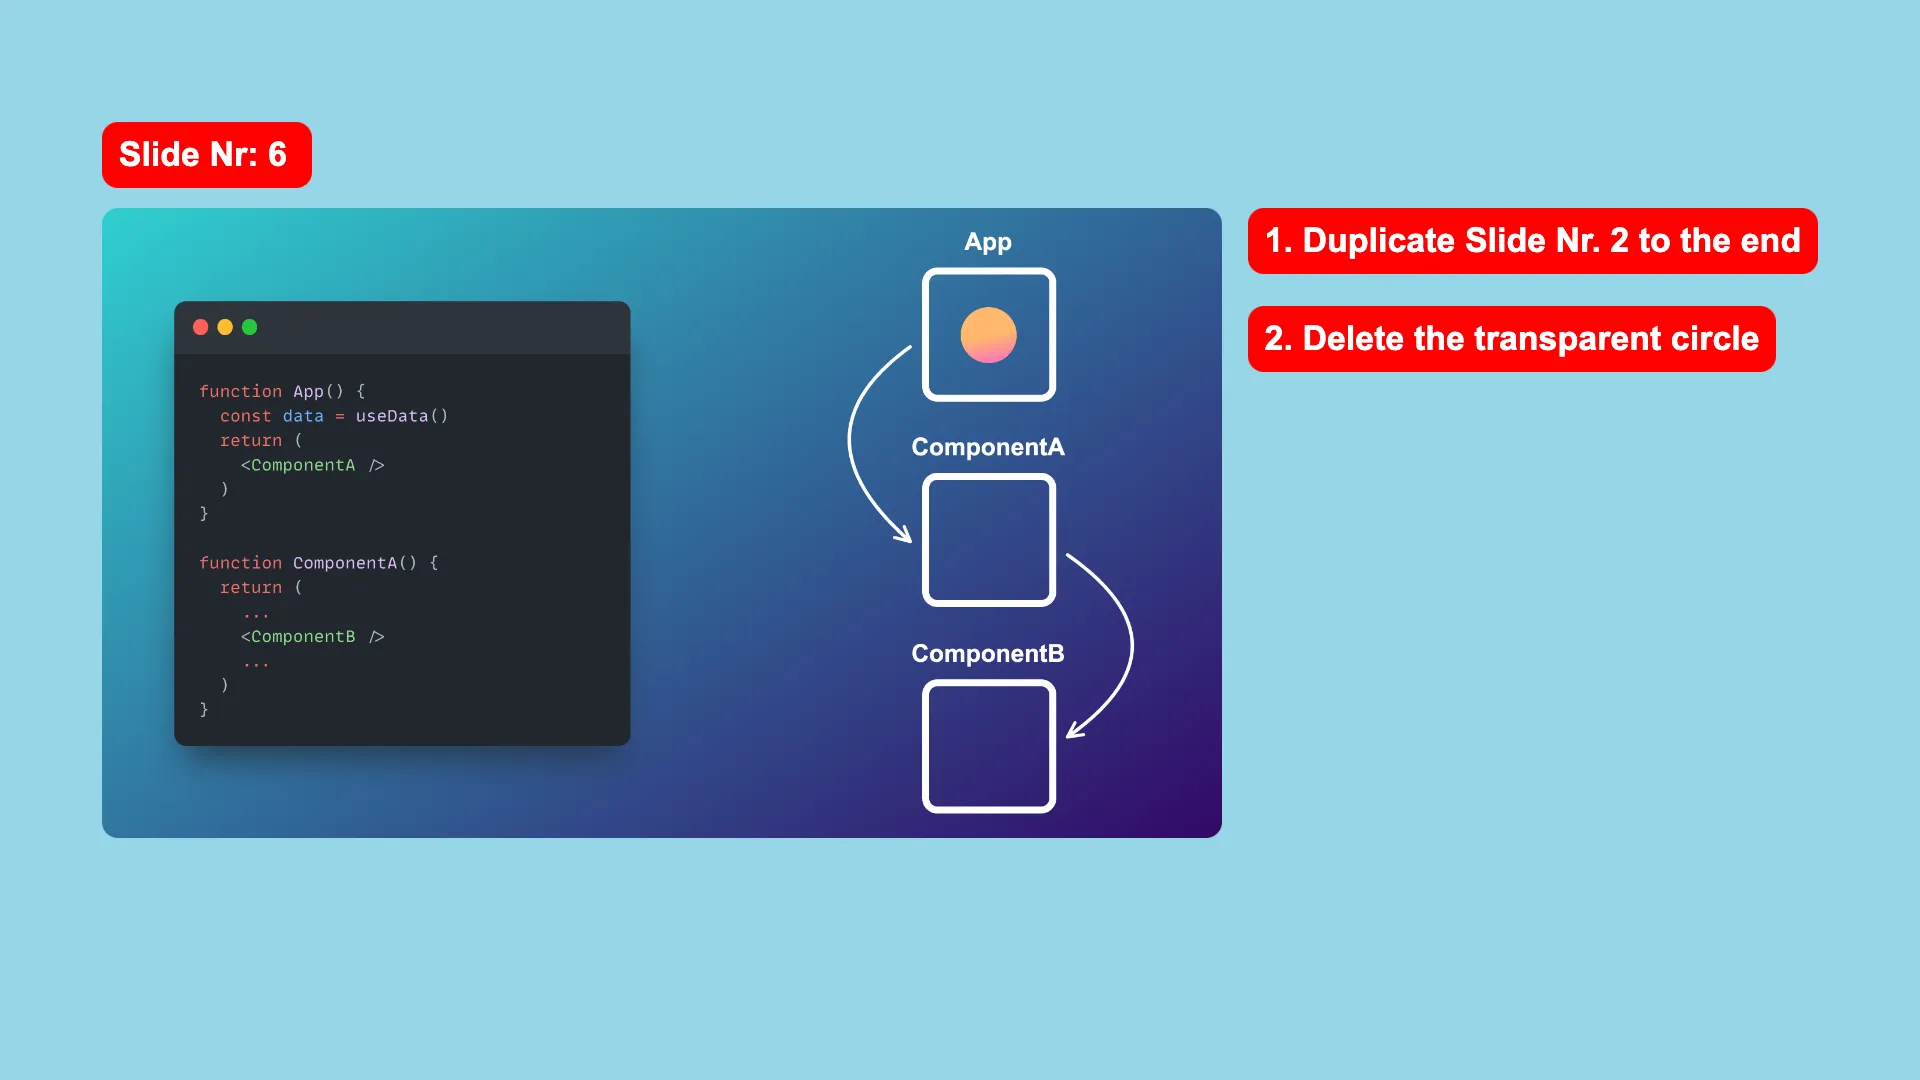
Slide Nr. 6
Step 1: Duplicate the second Slide to the end. In order to do that open the context-menu on the second Slide per right-click. Hover over the “Duplicate” option and press Ctrl . Then you will see that the option changes to “Duplicate to end”. Click on it while still pressing the Ctrl key.
Step 2: Delete the transparent circle.
Even though we want to create a circle movement animation from “App” to “ComponentB”, we need to delete the circle. Because in Slide Nr. 5 there is a circle element with the exact same animation id. If we won’t delete it then snappify will link the circles and run an animation.
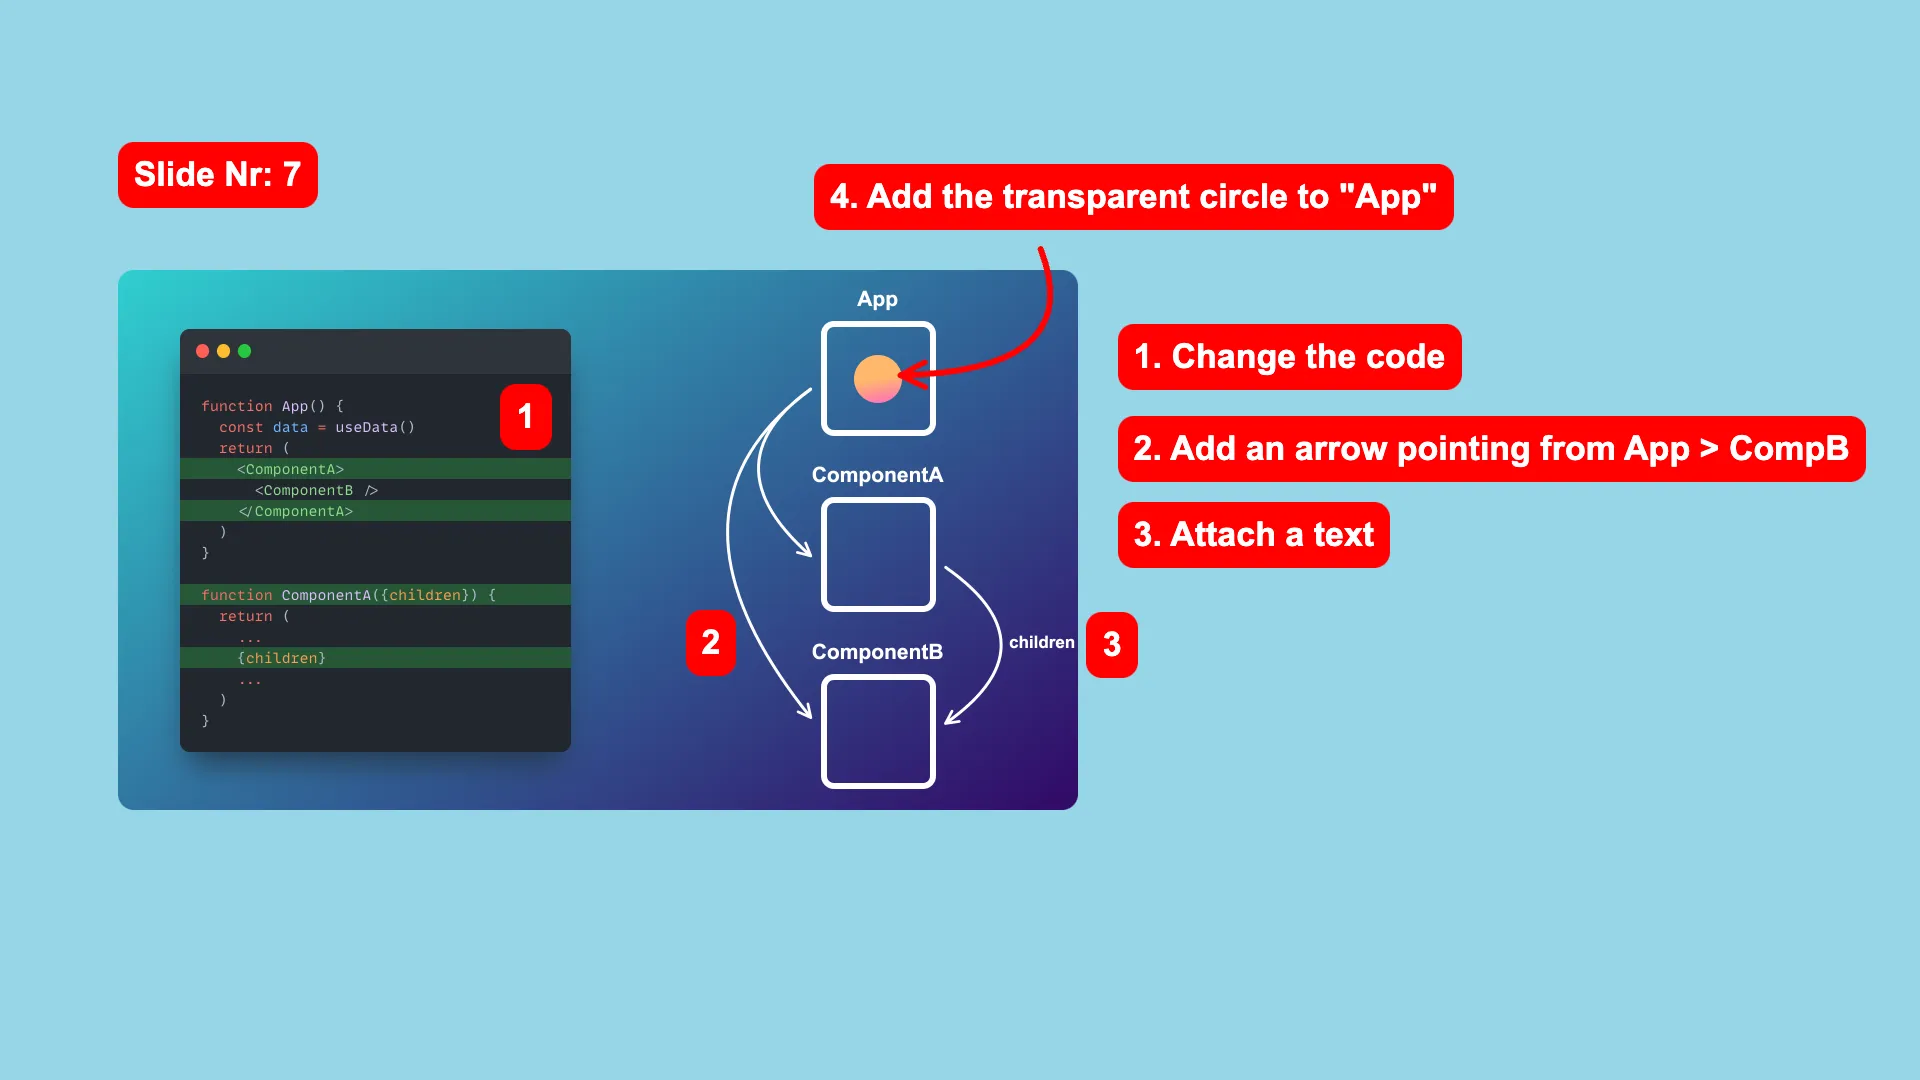
Slide Nr. 7
Duplicate the sixth Slide and make sure you are on Slide Nr. 7
Step 1: Apply the code changes. The code content increases (lines) but as you can see the editor stays vertically centered. This is due to the fact that we set the Y axis to Center in the Position Constraints.
Step 2: Add an arrow element pointing from “App” to “ComponentB”.
Step 3: Add a richtext element to the existing arrow from “ComponentA” to “ComponentB” and type children.
Step 4: Add again a smaller transparent circle to the “App” rectangle.
PRO Tip 💡: Go to the second Slide and select the transparent circle. Copy it ( Ctrl + C) and paste it ( Ctrl + V) to the Slide Nr. 7.
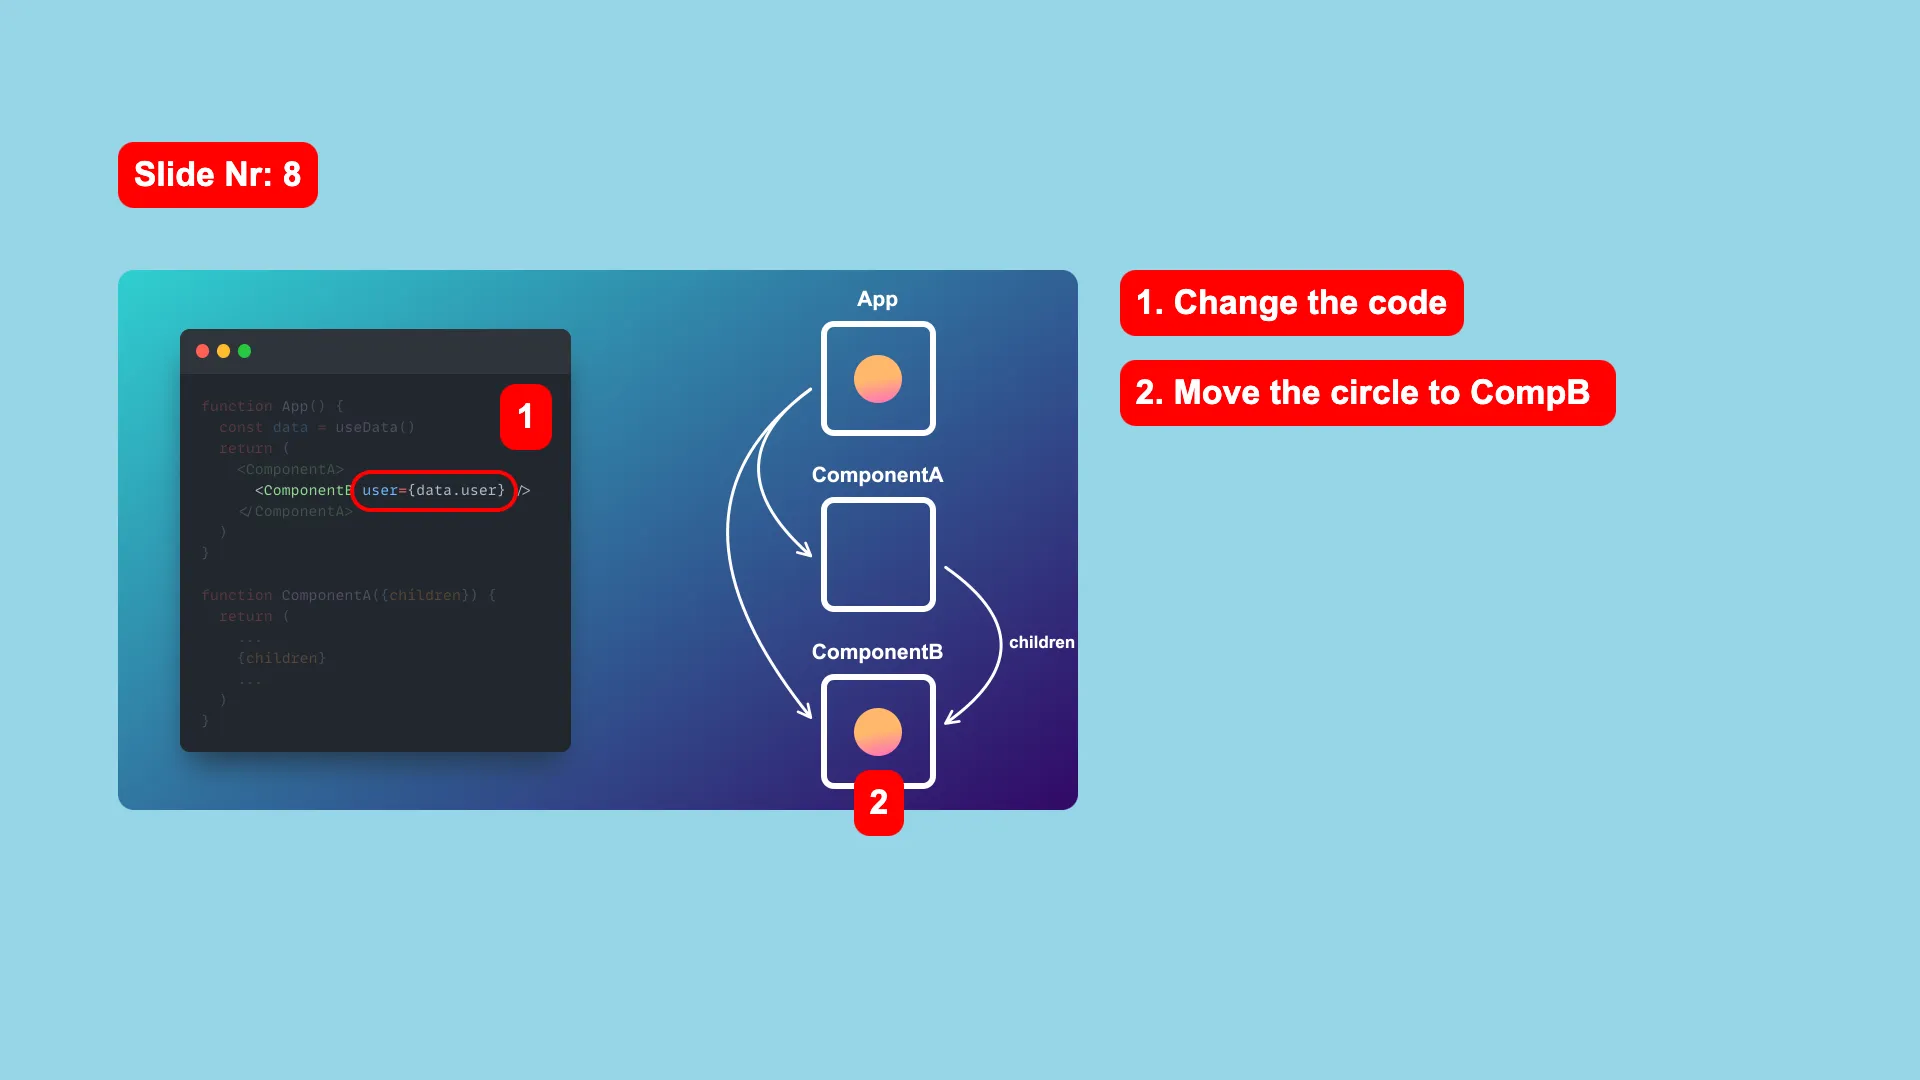
Slide Nr. 8
Duplicate the seventh Slide and make sure you are on Slide Nr. 8
Step 1: Apply the code changes.
Step 2: Move the transparent circle to the “ComponentB” rectangle, and make it visible and bigger again.
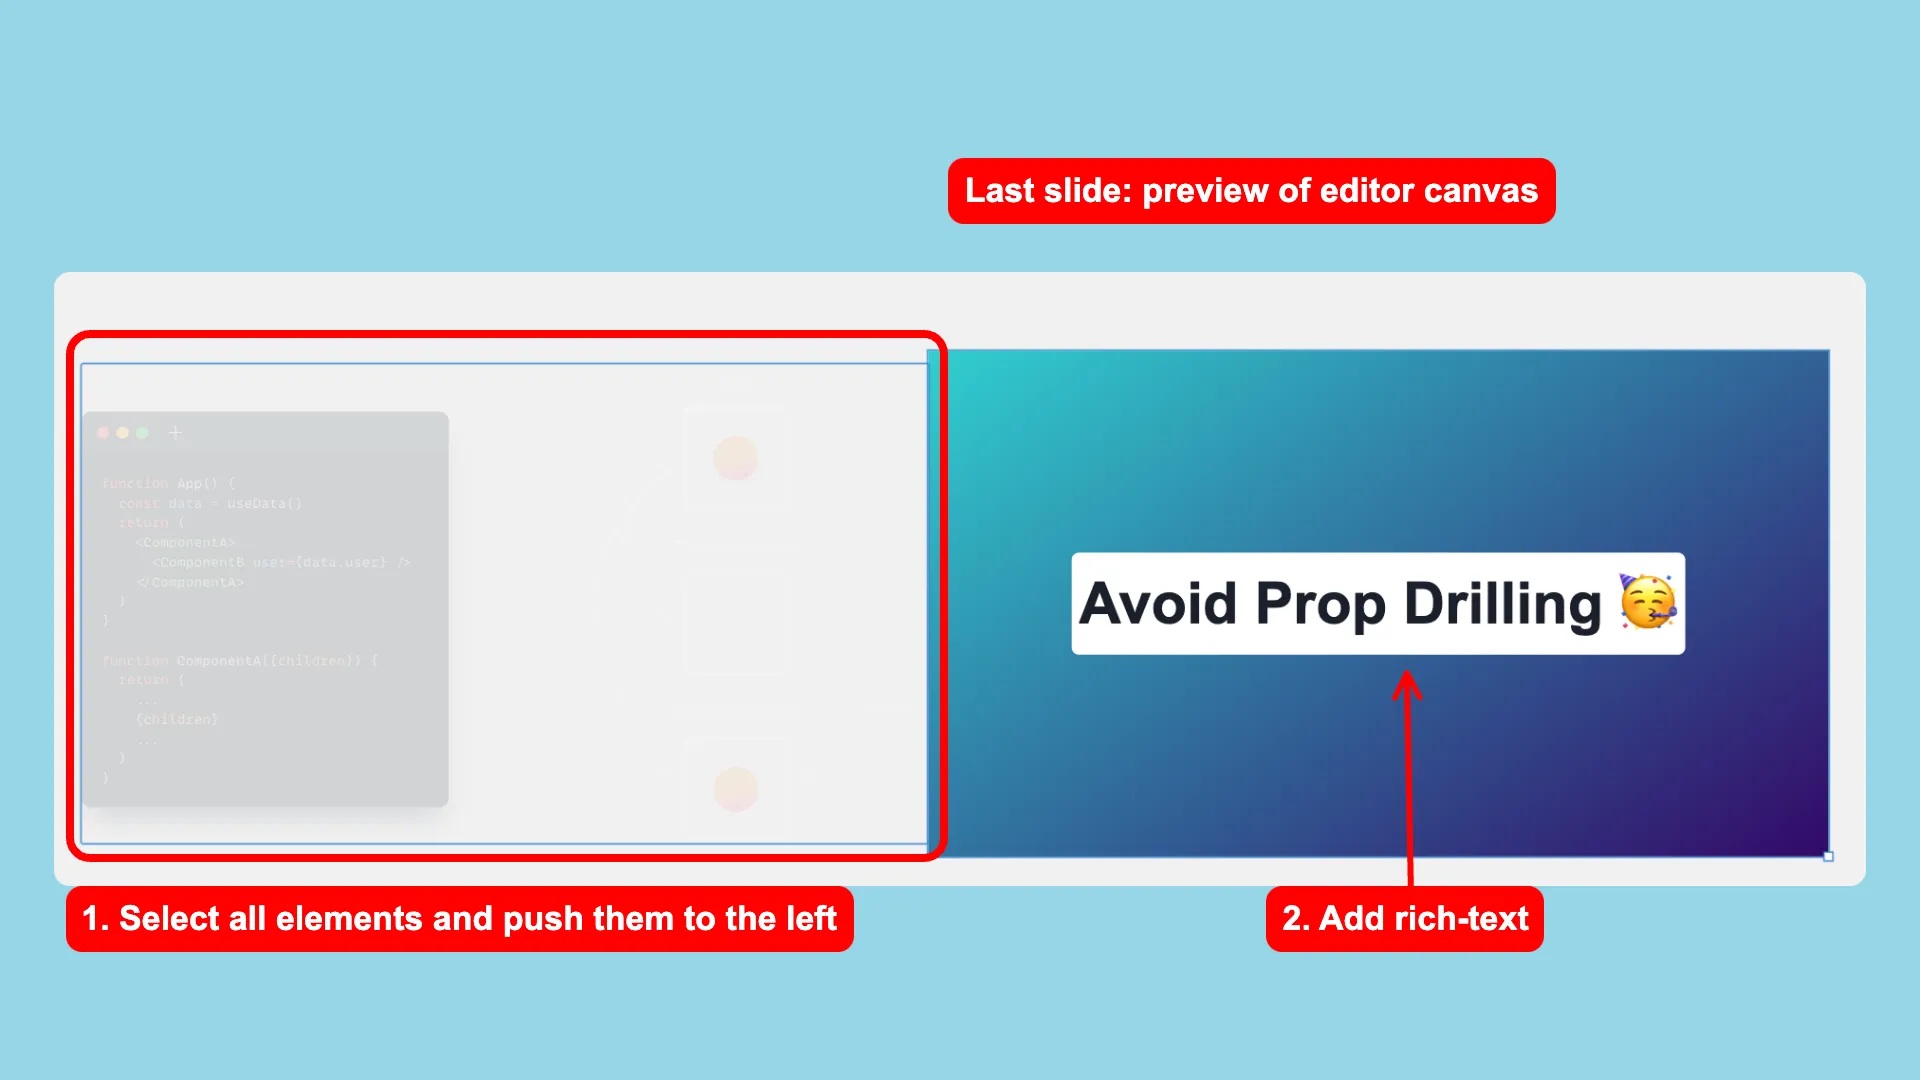
Last Slide
Duplicate the eighth Slide and make sure you are on Slide Nr. 9
Step 1: Unlock the locked elements in the element tree and select all elements. Then push them completely to the left of the canvas. With that, we create a SlideOut animation for the elements.
Step 2: Add a big richtext element and type Avoid Prop Drilling 🥳.
Thats it! We created a nice animated presentation with snappify. 🎉
Do you have open questions? Check out our documentation and don’t hesitate to reach out to us via the chat. We are happy to help you! 🤗