Product Update: snappify Slides
We started working on snappify in January 2021, already more than two years ago. In late March 2021 we released a simple MVP that enabled users to create beautiful images of their code snippets.
Since then quite some things changed. We listened to all kind of feedback and snappify evolved into a fully fledged design editor, with first class support for code snippets. By the end of 2022, it had become a professional tool for creating technical content, code explanations, and educational materials.
But we wanted more, and a specific idea started to gain more attention in our heads.
Giving our users the ability to create presentations and animations within snappify
Many of our users use the images they’ve created using snappify for their presentations or animated content. So we thought, why not enable our users to do it directly in snappify?
Our editor was already capable of handling most of the heavy work, so the challenge was to add the ability to create animations and provide a way to present them live on stage or export them as a video.
Another challenge we faced was making sure that the UI remained intuitive and user-friendly. We wanted to make sure that users could seamlessly transition between creating images, animations, and presentations, without feeling overwhelmed.
So let’s see what you can expect from snappify Slides 👇
Creating Multiple Slides per Snap
Each design file in snappify is called a “Snap,” and on the Dashboard, you can manage all your Snaps. Before introducing snappify Slides, each Snap could either be exported as an image, shared via a public URL, or even embedded into any website.
As we approached our new Presentation feature, we needed to provide a way to create multiple slides within a single Snap. This is now possible via the new Slide Picker at the bottom of the Editor. There, you are able to add new slides, rearrange existing ones by dragging and dropping, and also duplicate and delete them.

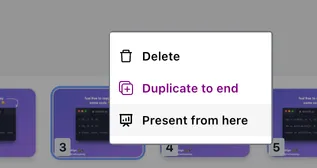
You can start a presentation by clicking the big purple “Present” button at the top of the editor. However, if you want to start it from a specific Slide, you can do so via the context menu.
Use Cases beyond Presentations
Before diving deeper into the new features we’ve introduced with snappify Slides, we want to emphasize that our vision is not only about presentations.
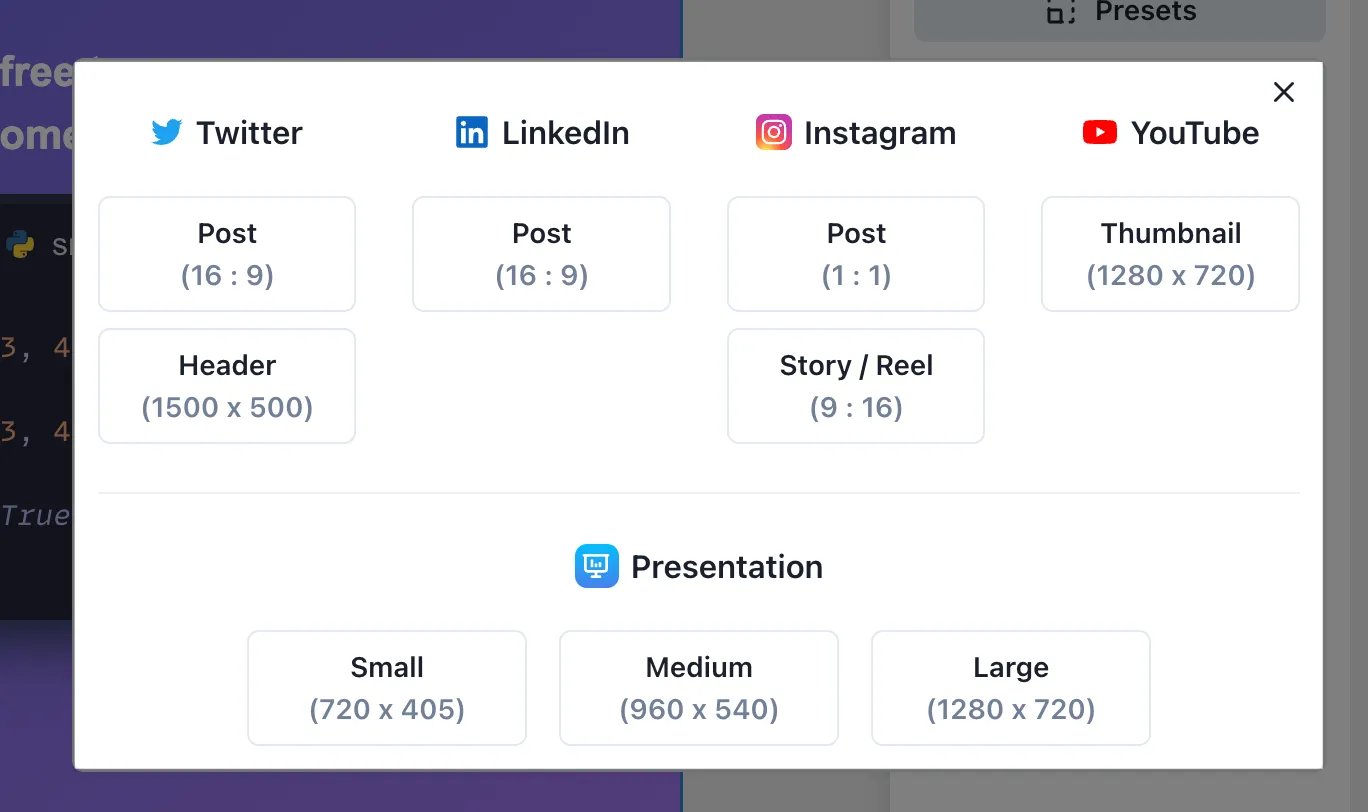
Slides also provide more flexibility for users who leverage snappify to create images for social media. By having multiple slides inside one snap, you’re able to easily optimize your design for several platforms without returning to the dashboard and switching between snaps.
To help with this, we’ve introduced some presets to quickly get you going with sizes for well-known platforms like LinkedIn, Twitter, Instagram, or YouTube.
So whether you’re creating presentations, social media content, animations, or rich infographics embedded on your own website, snappify Slides has got you covered. 💪
Animate Elements between Slides
Our goal was to make the process of creating animations inside snappify simple yet powerful.
By default, we smoothly animate the state of an element from one Slide to the other automatically, as long as they are “connected” to each other. Now comes the question: how do you connect an element with its counterpart on the next Slide?
By copying and pasting! You can either duplicate a whole Slide, which means that all elements on the new Slide are connected, or you can copy an element on one Slide and just paste it onto the next or previous Slide.
This way, you can create many different kinds of animations between Slides, as you can see in the example below (here we animate the snappify Logo using different transformations, like scale, rotation, and tilting):
Video showcasing the capabilities of snappify Slides
Animating Code Changes
Although you can create any type of content using snappify, we are still mainly targeting developers. Therefore, we have first-class support for code snippets when animating between Slides!
Below, you can see the different types of code change transitions you can configure on the “Animation” tab on the right toolbar when selecting a code editor element.
Video showing the different code change transitions
Embedding Presentations
As mentioned before, snappify was already capable of embedding interactive infographics into any other website or blog. Of course, we wanted to give you the same functionality for presentations as well!
That means that you can embed presentations where viewers can navigate through the Slides and easily copy the text or code snippets from there. That’s a game-changer and a great way to document complex technical topics.
Below, you can see an embedded presentation as an example:
Video Exports
As soon as we started the Closed Beta for snappify Slides, users approached us with the question: “How can I export it as a video?!”
We spent the last two weeks preparing the basics for making video exports in snappify possible and are happy to announce that we’re going to support it 🥳
However, we still need some time to figure out a few details. We plan to release the first prototype in the upcoming weeks. Be sure to sign up for our newsletter so you don’t miss it when it’s available!
Until then, we can only encourage you to do a screen recording while navigating to your Slides in snappify. It already works really well to create a video this way.
PDF & Zip Exports
We’re also happy to announce that it’s now possible to download all the Slides inside your Snap as a PDF or as a bundle of images in a .zip file.
The PDF can be especially handy for creating LinkedIn carousels or for presenting your Slides offline - a topic we also want to discuss in more detail 👇
Offline Support
At the moment, snappify is only functional with an existing internet connection.
We understand that this is not feasible for every occasion. While you can already export your presentation as a PDF and present it offline, we strive to provide full offline support in the future.
We’re not yet sure when we’ll be able to provide this, but you will definitely be able to present your snappify presentation, including all amazing animations, without an internet connection.
What do you think?
As I mentioned earlier, we have always loved developing snappify based on user feedback, and we want to continue doing so. We believe that this is the best way to steer the product in the right direction.
So please, don’t hesitate to reach out to us via our live chat if you have any questions. Also, please let us know if you have feature requests or if you’re missing something while using snappify!
snappify will help you to create
stunning presentations and videos.
Release Date / Beta Status
Although we still publicly run snappify Slides as a “Beta”, we’re very confident to say that the product is pretty robust and solid already. Quite some of our users used it for their presentations at bigger conferences or important company meetings.
We will still continue to use the term Beta until we have added all key features, such as more animation configurations and the ability to export videos.
Getting Started with our Tutorial
Anki has prepared an in-depth tutorial on how to create your first presentation using snappify. The tutorial explains the mechanics of our editor and how to create smooth animations between Slides.
If that’s too long we also prepared a short introduction video for you right here:
