How to Generate a Sitemap in your Next.js Application using next-sitemap

Adding a sitemap to a website is one of those things that is often overlooked and if not added, can hamper your SEO possibilities as your website grows. Sitemaps are a great tool for helping your SEO, they can be submitted to search engines like Google to help them identify, crawl, and then index the various pages on your website; allowing users to discover them and by extension you/your business sooner.
So, in this post, I’m going to show you how to set up a sitemap on a Next.js application using the next-sitemap NPM package.
Getting Started
To get started, you need a Next.js application, this can either be an existing one you already have or you can create a brand new one by running the command npx create-next-app@latest --ts. It will create a new Next.js TypeScript project which is what I’ll be using in this tutorial.
Now, cd into your Next.js application folder in a terminal and run the command npm i next-sitemap to install next-sitemap into your project. And, that’s our all prerequisites sorted, let’s now take a look at configuring and setting up our sitemap generation in Next.js
Configuring next-sitemap
The initial setup of next-sitemap isn’t too complicated, to get started, create a new file in the root of your project called next-sitemap.config.js, and as you might have guessed this is where we will be configuring next-sitemap and controlling how it will generate our sitemap.
For an initial configuration to get up and running, paste in the below code.
NOTE: The
siteUrlproperty is the only required property fornext-sitemap. But, there are other configuration options you can add to configure how your sitemap androbots.txtfiles are generated. You can see the complete list here.
In this configuration file, we want to check if we’re running in a production environment or not and then use that to control the siteUrl which is used to generate the sitemap. This ensures that when we are locally developing and testing our sitemap it is generated using http://localhost:3000 and is accessible to us without deploying. And, then of course when in production, the sitemap is generated using our proper domain so it is crawlable and indexable by search engines.
The next step is to add the postbuild script to our package.json. This is where next-sitemap will be called and run to generate the sitemap for our Next.js application. After our build script has successfully finished running and Next.js has built and exported all our pages, our postbuild script runs triggering next-sitemap to take the build output and generate our sitemap files before adding them to the public folder. This allows us to easily access them by going to YOUR_DOMAIN/sitemap.xml. To configure the postbuild script, add the below to your package.json.
Now, the final thing we want to do before giving our sitemap a test run is to add a few lines to the .gitignore file to make sure we ignore all of the sitemap files being generated locally. The reason for this is when we deploy our application to Vercel later on, it will generate fresh sitemap files using the correct production URL as part of the build process, meaning the local ones aren’t needed and would be using the wrong URL. So, to ignore these files add the following to the bottom of your .gitignore file.
Generating Our Sitemap
With all the configuration complete, let’s generate our first sitemap. To trigger next-sitemap to generate our sitemap we need to build our Next.js application. So, in our terminal run the command npm run build. This will build our application and then once finished trigger our postbuild script from earlier which will run next-sitemap to generate our sitemaps. Once the entire process is finished you should see an output similar to the one below.
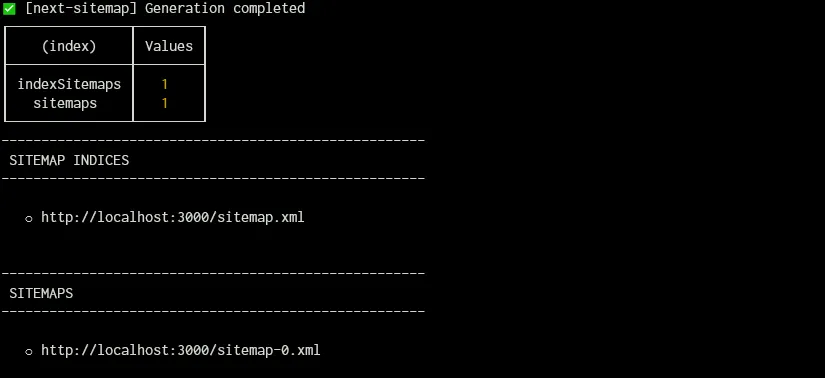
This output lets us know that everything was successful and that if we now start our application using npm run start and head over to the URL http://locahost:3000/sitemap.xml we will see our first sitemap.
NOTE: By default,
next-sitemapgenerates an index sitemap in thesitemap.xmlfile which contains the URLs for all of our sitemaps. This behavior can be configured in the configuration file from earlier but if you have a large application I would recommend leaving this behavior on so your application’s URLs can be split up to a reasonable number of URLs per sitemap and then all be indexed in one file.
If you head over to the actual sitemap page at http://localhost:3000/sitemap-0.xml, you will see all of our URLs (or, the first 5000 if you have more than 5000 URLs in total). Now, if you’re following along with this tutorial, you’ll only have one URL listed on this page which is the home page or the index.tsx file in the pages directory.
Let’s add a second page by duplicating the index.tsx file in the pages directory and rename it to page2.tsx. If we now stop our npm run start command from earlier and run npm run build && npm run start to rebuild our application, regenerate our sitemaps, and start the application again. Then after a quick refresh of the http://localhost:3000/sitemap-0.xml page in our browser, we’ll now see our new /page2 URL we just created as well as the home page we had from earlier.
Dynamic Routes
next-sitemap isn’t limited to just pages we manually create files for, it can also include pages created with dynamic routes in Next.js so let’s do that next. First, create a new folder in the pages directory called posts, and then inside the posts directory, create a file called [id].tsx and paste into it the code below.
Now, with our basic static generation page setup, let’s re-run npm run build && npm run start and view our sitemap at http://localhost:3000/sitemap-0.xml again. We now have two more entries, one for /posts/1 and one for /posts/2. Of course, this is just a minimal example but this can easily scale up to thousands of posts.
Deployment
For the final part of this tutorial let’s deploy it to Vercel and see our sitemap in production. To do this we need to set up a repository on GitHub (or, another provider of your choosing) if you don’t already have one. Then push our new code to our repository so it’s ready to connect to Vercel. Once you have your code on your GitHub repository, head over to Vercel and create a new project linked to the repository you just pushed your code to.
Now, if you’re following along with this tutorial and have created a new project from scratch we’ll need to update our next-sitemap.config.js file from earlier to include our production domain. So, after your new Vercel project has finished deploying take the domain it has deployed to and replace the YOUR_DEPLOYED_SITE_URL string in the config file from earlier; then commit and push it to the repository and let the project redeploy on Vercel.
Once the project has been redeployed, head over to https://YOUR_PRODUCTION_DOMAIN/sitemap-0.xml and take a look at your newly deployed sitemap that is ready for search engines to crawl and index.
Final Thoughts
In this post, we’ve covered why you need a sitemap on your Next.js application for SEO as well as how to add one to your Next.js application using the next-sitemap NPM package. If you want to find out more about the next-sitemap package you can view their GitHub repository here and their NPM page here. You can also see the repository with the code for this tutorial on GitHub here.
Thank you for reading.